Showing posts with label disassembly. Show all posts

Friday, 5 June 2009

How To Dismantle a Sturmey-Archer Grip Shifter

After another evening of work on Mauricio's 1969 Huffy/Raleigh Sportsman, I took the grip shifter home to try to figure it out. Turns out, it's pretty simple on the inside, but since I couldn't find any how-to guides on the interwebs about it, I thought I'd post one.

The whole works is basically held together by a little spring clip that fits just under the lip of the dial portion of the grip. I used a small screwdriver to pry the clip out of its channel. In the photo below, you see the clip after removal.

With that done, the housing for the shifter (at left above) just comes off (assuming you've already removed the screw that tightens the shifter to the handlebar), exposing the minimal inner workings of the mechanism. There are basically three parts: a small spring, a bearing, and the rotating mechanism to which the cable is attached.  The spring sits in a little hole, and the bearing on top of the spring. When the grip is turned, the bearing slides into one of three holes in the rotating mechanism, either tightening or loosening the shifter cable, and thus shifting the hub.

In the photo above, you can see the rotating mechanism at right with the red indicator arrow on it. Below, you can see the spring in its hole, with the bearing resting on top. 

That's about it. I haven't put the thing back together yet, but I'm guessing that making sure the cable and bearing stay in place while the spring clip is reattached is going to require at least one more hand than I currently have. I'll have to look into getting another one.

There's a fuzzy diagram here of the whole works, and if you combine it with the photos above, you can get a pretty good idea of how it all works. Apparently, though, this was not a very successful design and seems to have only been on 1960s bikes.

Wednesday, 25 March 2009

Schwinn Cleanup

I'm working pretty quickly on the Schwinn Project. Yesterday afternoon I took the whole thing apart, cleaned and polished the frame, cleaned and repacked the bottom bracket and headset, and polished up the crank and handlebar chrome.

I'll get some more photos this afternoon, but here's the top part of the headset after cleaning. I didn't get a before photo, unfortunately, but I had to show y'all how well this came out.

The bottom bracket was the same. Once I got the grime and old grease cleaned up, the internal works are in nearly pristine condition. I'm thinking that this old fella didn't see much use in its day, because there is virtually no wear on any of the bearings or cones. Still working on the wheels, but they're also cleaning up nicely.

Sunday, 22 February 2009

Sunday Work Log

I managed to put in a good amount of bike work today for the first time in a while. Here's what I did:
  • first three coats of paint on Huffeigh front fender
  • finished dismantling the fixie project bike
  • a bit of frame cleaning on the fixie project
  • clear coated silver chrome touch-up on miscellaneous Huffeigh bits
Other things I've been doing whenever I've had the chance include sanding the parts of the Huffeigh frame and rear fender that will be painted, and trying to figure out how to get the stuck crank cotter and stuck seat post out of the fixie project. Tonight I'm hoping to rebuild the rear wheel on the Huffeigh, except for one spoke, which needs to be replaced and hasn't been obtained yet. Sorry about the lack of photos, I was more intent on getting the work done than taking photos of it. I'll try to get some up this week.

Friday, 13 February 2009

The Mundo: Fixie Mock-Up

I spent a couple hours this afternoon removing all of the crusty bits from "The Mundo." As long as I had everything off, I thought I'd throw a couple of things on it to see what it might look like as a fixed gear. The bars and seat are from the Huffy/Raleigh. I'm seriously thinking about using the bars, but they'll need a shim to fit the stem because they're not thick enough. The saddle, of course, is not a keeper, but just to see what a saddle would look like on it, and to rest on when flipped over.

I think it's going to look pretty sexy if I can pull it off. Even just mocked-up, I like it a lot. Thinking of redoing the baby? sky? blue paint with the head tube between the lugs painted white with some sort of custom head badge/decal. Although, as my grandmother used to say, I might be putting the cart before the horse.

The photo below is all of the stuff I took off, except the ape-hanger handlebars, which I'm going to try to clean up and resell. Quite a pile! And yes, that is the front axle still attached to the basket support. The nut on that side is frozen. In the photo above, a hex wrench is doing duty as a temporary axle.

Sunday, 11 January 2009

Huffy/Raleigh Bottom Bracket

My Park Tools HCW-5 spanner came in over the weekend, and I immediately opened up the bottom bracket and found this waiting inside. What the hell is that stuff? Once again, I've posted a few more photos at my Flickr photostream.

I also found that the left side bearing race on the crank axle is badly pitted, although the bearings themselves and the adjustable cone seem to be fine. This isn't terrible news, since the left side cotter pin notch on the axle was also terribly worn and mangled, and I have an eBay-find replacement axle coming in the mail that should work (watch, now that I've said that, it won't fit!).

On a side note--it's always good to have the right tool for the job. I'd tried loosening the lock ring on the bottom bracket by tapping with a hammer and screwdriver (carefully), but no go. I was expecting a struggle to get the ring off, but I barely had to put any pressure on the spanner at all before it came loose. Just goes to show that a good tool is never a bad investment (minds out of the gutter, people!).

Monday, 5 January 2009

Huffy/Raleigh Cleanup

I've lost track of the number of days I've worked on this bike so far, so no more "Day 5", "Day 16", "Day 146" updates.

I've mostly been hard at work on the cleaning. I'm still waiting on a special-order lockring spanner wrench to get the bottom bracket apart, and in the meantime, I've taken down the front wheel and cleaned and repacked the hub. I didn't take photos of the process because cameras and bearing grease aren't a good combination in my less-than-capable hands, and I still haven't been able to hire that assistant (or housekeeper, for that matter). But here's an after photo of the front rim and hub, shown beside the rear wheel for a before/after comparison.

My project over the weekend was to completely clean and repack the pedals, which are in good enough condition to reuse. They were in such rough shape that it took me an entire afternoon, but I'm pretty happy with the result. The photo below shows the clean bits of the outer bearing assembly of the right pedal. More photos at my Flickr photostream.

Basically, all the other parts (except the rear wheel--I'll have something to say on that later) have now been cleaned once, just to see what I'm dealing with in the way of chrome and paint disintegration, and I'll be cleaning everything very thoroughly and meticulously again before reassembly.

The story isn't great for the chrome, which I'll post on later, but the paint isn't too bad. I won't have to repaint everything; the fork, for instance, is in brilliant condition, and most of the down tube is almost pristine. There are some trouble spots, however, where rust has done away with the paint almost entirely. For repainting, I've settled on the front and rear fenders, the chain guard, the top tube and head tube, and the seat stays and chain stays. All of the decals on the chain guard and frame will be preserved, however. Hey baby, I'm rollin' on a Huffy and I want people to know it! (that was some subtle sarcasm--for those who don't know, Huffy developed a rather poor reputation in the half-century since this bike was made).

Anyway, I promise more regular updates in the new year as I work on this project. I'm hoping to put everything back together and assemble all of my replacement parts by spring, but I'll also be finishing and defending my PhD dissertation between now and March, so I may drop off the edge of the blogosphere for a little while in late February. Just so you know.

Friday, 26 December 2008

The Huffeigh's Stuck Stem Bolt: An Inelegant Solution

Last week, the Huffy/Raleigh underwent an operation to free the stuck stem bolt/expander wedge. You'll remember that the bolt was stuck fast, despite loads of penetrating oil (I even tried the WD-40) and about two weeks of letting it sit. To complicate matters, the head of the bolt was stripped so that I couldn't get a good grip with any kind of wrench, pliers, or grips. I finally settled on that ultimate in refined tools: the hacksaw.

I first sawed down through the washer, so that I wouldn't have to undercut the washer to get the head of the bolt off cleanly. I was also working partially on the theory that the head of the bolt and the washer, instead of being two pieces, were actually one. The photo below shows the status of things at this point:

Now, with a good vantage point to cut the bolt, I laid the bike down on its side and began cutting. I was able to saw through the bolt cleanly, flush with the top of the stem (I stupidly didn't get a photo of this). Turns out that the bolt and washer were indeed two pieces, but had partially fused with rust and an extreme case of over-tightening at some point. I then stood the bike back up (resting on the fork and bottom bracket now) and set about trying to tap the bolt down to knock the wedge loose.

Unfortunately, with the sawn bolt now flush with the top of the stem, it was quite difficult to hit the bolt hard enough to dislodge the wedge, and my efforts were not successful. I had already purchased a replacement stem and handlebars (a one-piece deal off a 1960s J.C. Higgins--very close in shape and spread to the original, but the bars not adjustable) on the assumption that I might have to do something drastic, like cut through the stem, in order to get the wedge knocked loose. So, I gritted my teeth and set about cutting through the stem to get better access to the bolt.

I again laid the bike down, resting on a couple of paving bricks padded with a towel, and started sawing through the stem near the top. I cut around the stem, rather than through the bolt in order to preserve as much of the bolt as possible to get a grip on. Here's the result:

Once I stood the whole works back up, I was able to grip the bolt with pliers and turn it loose, which it did maddeningly easily. So, the bolt wasn't rusted to the wedge after all! The problem turned out to be that the wedge was a bit too wedged in the stem tube--so much so, in fact, that just knocking the bolt (and quite hard) wasn't about to dislodge it.

With the bolt removed from the wedge, I was able to get a rather long and hearty screwdriver down in there and after a good deal of pounding with the hammer, managed to finally knock the wedge out. After that, I was able to separate the stem and fork easily, and I even managed to catch the loose headset bearings quite neatly as I pulled the fork from the head tube, allowing me to forego the swearing, muttering, hands-and-knees search for errant bearings.

All told, the only victim was one original, but very rusty, stem. I must say, I really hated to destroy the stem, but I'm not too broken-up about it, since I have the new stem already, and I can probably find an even better replacement at some point down the road. I might have puzzled through a better way to accomplish this whole operation, but I'm well enough pleased with how it turned out.

So, final verdict on a hacksaw as a bicycle tool: quite effective, if a bit drastic. Gives new meaning (or, perhaps, original meaning) to the phrase "bike hacks."

More on the cleaning progress soon, including a stow-away hiding in the frame.

Saturday, 13 December 2008

Reader Project: Ian's 1936 Rollfast

As promised, here is Ian's 1936 Rollfast, mentioned a couple of posts ago. Ian sent me the full link to his Picasa album, which for some reason was chopped off in his comment the other day. Here's the link, which includes some very helpful text and some nicely labeled parts, including the bits of the bottom bracket and headset. I hope I can encourage Ian to post some more pics, too, especially of that stylish rear reflector. And maybe it's just me, but I actually like those painted black handlebars with the brown grips.

Monday, 8 December 2008

Huffy/Raleigh: Day 4

I'm thinking of starting a new series on the OBB called "What's Wrong With the Huffy This Week." My main problem right now is that the stem bolt is stuck fast. The problem, I think, is that someone a long time ago pulled the stem up too far, exposing the slot on the stem steerer tube. Normally, the expander wedge and stem bolt would have been protected by being fully enclosed within the head tube, but exposing that slot in the steerer tube allowed moisture in there, and I think the wedge has rusted to the bolt. I've been soaking the whole works in penetrating oil, including turning the bike over and pouring oil down (up?) from the opening at the bottom of the fork tube (which actually gets oil on the expander wedge where it is attached to the stem bolt), but no luck so far. To make matters worse, at some point after it seized-up, someone apparently tried to get the bolt out and rounded off the corners, so I can't even get a good grip with the wrench. I, like my stem bolt, am stuck. Any suggestions?

More problems, er, "challenges" to come, including a fun little bit of jagged metal wedged between one of the crank cotters and the crank axle, which has chewed up the latter. Someone really did a number on this poor guy at some point.

Sunday, 30 November 2008

Day 1 & 2: Huffy/Raleigh Sportsman

The first shiny bits made their appearance today. I've got the wheels, fenders, chain guard, kickstand, etc. off the bike, but have left the handlebars/stem/fork assembled and the saddle and post on so that I can upend the bike to clean from all angles. I always clean everything first before I get too serious about the technical bits like bearings, crank, hubs, etc. Part of the reason is so that I can handle the bike without getting too dirty, and I also like the psychological boost I get from sprucing everything up. I washed the whole frame with Pedro's Bio-Clean squirted on a wet cloth, then went over it with rubbing compound to get a deeper clean and to coax what luster is left out of the paint. The fork and its chromed cap came out beautifully, but the head tube reveals the overall poor condition of the paint. The head badge turns out to be chromed copper, which explains the greenish hue it had. I made a go at the handlebars, and confirmed that much of the chrome is flaking off, but what remains shined up better than I expected; same with the stem. I didn't take a photo of that yet.

Tuesday, 28 October 2008

How to Dismantle a Suntour Bar End Shifter

An OBB reader and fellow Flickrer has posted a wonderful nine-photo sequence (link goes to first photo) on this very subject, complete with how-to and how-it-works notes. I'll have to take his word for it, but it sure sounds like he knows what he's talking about! Bar end shifters are quite popular these days, so it's definitely worth a look if you're thinking about a pair.

Wednesday, 17 September 2008

How to Remove Crank Cotters

Disclaimer: I am not a professional bicycle mechanic. This account of my experience is intended for entertainment purposes only (woohoo!), and should not be considered the advice of a professional. In other words, I'm not responsible if you bungle the job!

That being said, let me say (as commenters RB and Giuseppe assured me), that this was not hard at all! Guys, you were right, it was probably the easiest thing I've done on this bike. 

Sheldon Brown, God bless him, can sometimes make things sound much harder than they are. Based on Sheldon's guide, I was certain that I would mush the cotter pin, ruin my crank, and undo all of my good work on the Runwell. While doing the job correctly is important, it is not as hard as some internet bicycle gurus make it sound. That being said, Sheldon's word on the subject is still the standard, and it helped me a great deal. 

You need only three things for this job: 1) a block of wood (I used a scrap of 1" x 8" board) cut to fit under the crank arm to support the arm when you hit the cotter pin; 2) a claw hammer (I padded mine with a small piece of rubber cut from an old tube in case I missed the pin and whacked the frame); and 3) some penetrating oil to lubricate the pin. You can also
 use a piece of soft metal pipe (like copper) instead of a piece of wood, placed under the pin, but I doubt if most folks happen to have a piece of pipe in the correct length just laying about--I sure didn't. I also cut a piece of thin cardboard to protect the bottom bracket if I swung wild, but it proved unecessary.

Here's the setup:

I applied the penetrating oil liberally directly onto the pin a few days before I made the attempt, since I was a little apprehensive and wanted to give myself the best chance of success. Remove the nut and washer on the cotter to access the point where the wedge of the pin meets the flat of the crank axle inside the crank arm and apply the oil directly.

Once the oil has had a chance to work, you're ready to begin. Brace the crank arm on the wood block so that the threaded end of the cotter is pointing up, since this is the end you will strike with the hammer to drive the pin out. Needless to say (I hope), the nut and washer should be removed before you go at the pin with the hammer. With the crank arm braced and the washer and nut removed, all that's left is to whack that little bugger. Strike the pin a hard blow squarely with the hammer--imagine you're trying to drive a nail in just one whack. Grip the hammer as far away from the head as possible, like any good carpenter, since this will help deliver a more powerful blow. Here's what happened after just one strike:

I then tapped the pin gently all the way out, using a little screwdriver as a tap. And that's that. The other side was just the same; one strike and the pin was loose enough to just tap out. No damage to the cotters, the axle, the frame, or the bottom bracket in the process. In fact, unless you're some sort of hulking brute, it's unlikely that whacking the pin will do any sort of damage whatsoever. That's easy for me to say now that I've accomplished it, but this had been a point of some concern. Here are the pins after extraction; the one on the right is the damaged one that was causing my clunk (you can see the stripped threads):

Here's a bit about how cottered cranks work. The pin goes through the crank arm and that flat side gets wedged tight against the flat side of the crank axle (see below). 
The flat of the pin contacting the flat of the axle is what turns the crank when you pedal, and the nut is just there to keep everything snug.
I'll say more about the mechanics of the whole operation and have some better photos when I install the new cotters in a few days (when they arrive in the mail). Hopefully that will go as smoothly as this did. I sound all confident now, but I was quite nervous when I started. Just goes to show that the things you worry about the most usually end up turning out the best (and the things you didn't think to worry about knock you on your arse).


Wednesday, 20 August 2008

The Runwell: Days 9 & 10

Despite my recent disappointment at the utter failure of Menotomy's "Vintage Bicycle Cleaning Kit" (grrrr), I've been plowing ahead with the rear wheel cleanup. Unfortunately, although it is certainly better than it was, I have had to settle for an "antique patina" finish rather than shiny chrome and steel. The chrome is simply wasted after years of rusting outside. As a testament to the heartiness of the old construction, everything is still structurally sound, just cosmetically ruined. I'm still pressing on with my plan to get the bike back up and running before thinking about repainting and re-chroming (after all, I've not even ridden the thing yet), but someday down the road, I'll do both. Until then, no riding in the rain (not hard in SoCal). Here's the after picture of the outside of the rear hub, with the Perry mark relatively clear. The shiny strip is the result of being covered by the dust clip for so many years. Below is the before picture, so you can see that I did accomplish something. Right now, I still have the wheel completely taken apart, and everything is clean (if not shiny). I've never taken apart or reassembled a wheel before, so I'm advancing with trepidation, but I have faith that I'll be able to figure it out. I only attempted it here because the single-speed wheel on the Westwood rim is built without a dish because there is no derailer and gear cluster to compensate for, making it a much more straightforward build. For those who are interested, the rear rim is a 40-spoke design, typical of old English bikes, but not otherwise very common.  I'm going to hold off posting a "how to" about reassembling the wheel until I see if I actually "can do," but check out Sheldon Brown on wheel building in the meantime. Once the wheel is back together, both wheels and the frame are off to the bike shop for truing and to have the cottered cranks and stubborn stuck pedal removed. Once that's done, I'll just need to assemble all the replacement parts, and put 'er back together. I'm sure it won't be that easy, however.
 

Saturday, 9 August 2008

The Runwell: Day 8

While I wait for some super-spiffy cleaning solution to arrive by mail so I can properly clean the rear wheel, chainring, and crank arms, I decided to re-dismantle the rear hub and really clean the whole thing up. Here's all the little bits (more or less) looking much cleaner than they did previously.  To be perfectly honest, making all these dirty little parts all nice and clean again gives me a great amount of pleasure. It's probably 2/3 of the reason I like working on old bikes. As for the condition of everything in there, frankly, there's some wear, as one might expect from a seventy-odd-year-old hub, but only time (read: reassembly) will tell if everything still functions properly. I believe it should, but what do I know?
      

Wednesday, 6 August 2008

Perry Coaster Brake Hub

In response to my query a few days ago, a kind reader (rb, of A Balanced View) has helped me identify my rear hub as a Perry & Co. coaster hub (i.e. back-pedaling brake).  Apparently, the big arm (the brake actuator) coming off the left side of the hub and clamped to the frame should have been my first clue (you learn something new every day).  Here's a diagram of the hub, with all the bits identified.  I'm thrilled that I have a coaster brake--I haven't had one since I was a wee lad.

Tuesday, 5 August 2008

The Runwell: Day 7

I finally finished scrubbing the rust off the handlebars today, and found a chrome situation not to be envied. Well, it's not that bad, and it looks better in the picture, but there are definitely some spots where the chrome is gone, and the spots under the grips (not shown here) are quite badly rusted. I used fine steel wool and rubbing compound, followed by buffing with Brasso and a soft cloth. I think I've decided not to have everything re-chromed and re-painted just now. I really want to get the bicycle back together and try it out before investing that kind of money on it.

Next, I think I'm going to tackle the chain. A lot of people just chuck an old rusty chain without a second thought, but I've always had good luck cleaning them up and re-using them. I think this one is actually fairly new, too, and just looks like hell because it was stored outside. Well, I'll at least make a go at it, and see what it looks like under all that surface rust. EDIT: Never mind, I got to looking at it, and decided it's just not worth it to clean up the old chain, and that's saying something for a cheapskate like me.

Saturday, 2 August 2008

The Runwell: Day 6

Today's tasks (because I just couldn't fathom another day of rust-scrubbing) involved cleaning and repacking the front hub, which went quite well, and dismantling the rear hub just to see what was in there and how bad it was. I knew it would be pretty gummy and dirty because the rear wheel barely turns. I had no idea. The photo on top shows the relative positions of the major pieces before I wiped the worst of the gunk off (yes, I know it needs gunk to work, but this stuff was--and still is--pretty badly gummed-up). The middle photo shows a more exploded view of the components, and the third photo shows them with the worst of the old grease wiped off.  
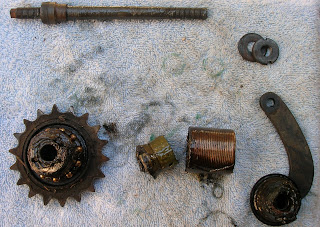
Also, having never taken apart a single-speed hub before, I was surprised at the complexity of the mechanisms. I mean, it's nothing compared to a three-speed hub, which frankly scares the ever-loving crap out of me, but I wouldn't have thought that just a single-speed would have so many moving parts. I can't find any exploded diagrams of single-speed hubs, and the outside of this one is still too rusty to find a manufacturer's stamp. Does anyone know if there's a general guide or diagram to one-speed hubs out there on the interwebs? I'd like to know what all the little bits are called.

Thursday, 31 July 2008

The Runwell: Day 5

As you can see from the photo above, disassembly continues.  As I go, I'm still doing major surface cleaning, focusing most on the rust.  No dramatic results to report so far, just plugging away at it and applying liberal doses of elbow grease, although you can start to see a difference on the handlebars.  

After checking prices on new Brooks saddles, and confirming my inability to buy one just now, I've decided to have a go at resurrecting the original.  The left photo shows the before condition, the one below shows how it looks after liberal doses of saddle soap and neatsfoot oil, more of which will be forthcoming.  It's actually not looking too bad, although its age and general decrepitude are still obvious.  It should be serviceable, however.
 

Tuesday, 29 July 2008

The Runwell: Day 4

There's not much to report for today. I spent most of my time trying to get the #?@$& stuck left pedal off. Didn't happen. I guess I'm going to have to take it to a shop, which is okay, because I think I also want to have them pull the crank cotters, since I hear that can be a real pain.  A big part of DIY work is knowing when to concede. 

I did pull the rear wheel off today, and also got started on some of the rust on various surfaces, including the cranks and handlebars. I'm starting to get a little daunted at all the rust. I think everything is sound underneath, it's just a matter of getting all the rust off in the first place. I've got some more photos up at Flickr, too.

Sunday, 27 July 2008

The Runwell: Day 3

Today's big task was the front wheel: getting the rims, spokes, and hub cleaned and inspected. Everything seems true and tight and sturdy, and it certainly looks better now than it did. I used a combination of light oil and steel wool, and Brasso polish. I also had a go at removing the pedals, but was only able to get one off.  The other is stuck fast and is going to need some serious help. The pedals weigh about half a pound each (a slight exaggeration, perhaps), which surprised me. I also got most of the paper or cardboard, or whatever was under the grips, off the handlebars, and realized that probably the worst rust on the bike was hiding under there. 

Once I get a rust treatment on, they should look better, and hopefully there's not too much damage. I guess I'd rather have it there than anywhere else, though. Work is probably going to slow down a bit, as I have more pressing obligations to attend to, but I'll keep posting my progress here as I go.

Ping Blog

Step 1
Blog URL:


Blog Title (optional):


Blog RSS Feed (optional):


I agree with terms of service.

Step 2
Copy the following code and put it on your blog/site to help our blog ping tool track your submission (Need help?):
;

 
Design by Free WordPress Themes | Bloggerized by Lasantha - Premium Blogger Themes | Best Buy Coupons