Sunday, 30 December 2007

Tour de Florida (Canyon)

Well, I'm back in San Diego after a lovely trip to Oregon for the holidays. It rained almost the whole time, but we had a light dusting of snow on Christmas--the first time it has snowed on Christmas there for quite a while. I took a little jaunt on the Peugeot yesterday to put it through its paces, having previously only ridden it up and down the alley to get the derailers adjusted. I rode down through Balboa Park on Florida Drive to Pershing, then turned around and came back. It's a pretty short ride (about 4 mi. round-trip), but from my house to Pershing, there were enough elevation changes to work through all of the gears and also enough flat open space through the canyon to open 'er up. I never had a ten speed when I was a kid, so it was a new experience for me and a lot of fun. Hopefully, many more such rides in the new year. I didn't take a camera with me to take any pictures, but go to my Google map to see my route. You can also see the Street View of Florida Drive if you open a regular Google map of San Diego--I'm not sure why it isn't an option on my customized map. Especially noteworthy is the nice bicycle lane, although the road surface itself is not in great condition.

Sunday, 9 December 2007

From the Family Archives

I recently came across this photo of my father, circa late 1940s/early 1950s, the proud owner of a new Schwinn. Since not a lot has been going on with my bikes lately, I thought I'd post it. Imagine him tearing around the dusty back roads of eastern Nebraska on this thing. Not sure what happened to the bike--it's probably in somebody's barn or garage. I don't know much about Schwinns, can anybody identify the model from this picture?

Monday, 3 December 2007

End of an Era

I discovered while working on my new old 10-speed Peugeot this past weekend that it needs some specialized tools to really take the whole thing apart. As a result, I was basically just able to clean things up a bit and replace the tires and tubes, rather than re-pack bearings and whatnot like I wanted. On the plus side, the front and rear derailers are now working well. The main problem was the gucked-up chain. I cleaned the chain with Pedro's Bio Cleaner twice with a toothbrush and then let it sit in a moderately heavy coat of oil overnight. I then wiped off the excess oil and--viola!--the chain was nice and smooth.
My irritation at not being able to access all parts of this bike with common tools got me thinking about bike culture again. It was with the 10-speeds in the 1970s and 1980s that most bicycles became mechanically inaccessible to the average rider. Special tools and more complex gearing systems ensured that even folks with the desire to work on their own bikes have to amass an arsenal of specialized, expensive, or hard-to-come-by tools. This means that professional mechanics at bike shops become the keepers of "bike wisdom" and know-how, which creates a mystique of exclusivity and inaccessibility for the average person. It also creates a sub-culture of amateur "gear heads" who become obsessed with the minutia of bike parts and tools, living out their fantasies of ditching the corporate world for the life of a grease monkey or professional racer. Most people associate an interest in bikes and DIY maintenance with this exclusive and frankly obnoxious subculture, and don't want to have anything to do with it.

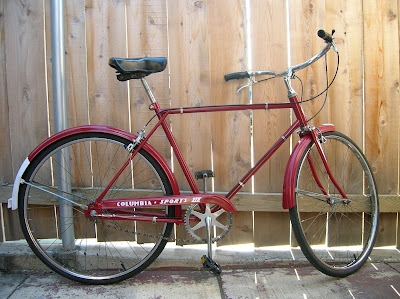
I refurbished the Columbia only with common tools available at any hardware store (except the cable cutters and chain tool), most of which I already had in my toolbox. The Peugeot, on the other hand, which is almost the same age as the Columbia, is virtually inaccessible to me with the tools I have and what little common sense I possess. Unfortunately, the trend over the last three decades has gone the way of more complex and inaccessible bikes, and the bikes that everyone could work on themselves have virtually disappeared. Sure, lots of folks do all their own work, but they're people who see working on their bikes as a hobby to invest both time and money in, and these people are a distinct minority. The average person is completely intimidated by their bike, and wouldn't know where to begin. I have been, and largely still am, that person. It's not the whole reason, but I think it's a big part of why more people don't get out of their cars and onto a bike.

Thursday, 29 November 2007

Gettin' the Word Out

Big thanks to Hank over at the Flickr photo group Three Speed Bicycle Lovers for posting a nice comment to the group about my blog (with photos and everything!). I hope reading over my miseries and joys proves instructive and/or entertaining for any folks who followed the link over here. And I hope my new 10-speed project doesn't disappoint--the Columbia is still my main ride. If anyone has questions or comments, please feel free to post them, and I'll either write you back personally, or post answers to the blog if they'll be useful to the group. It was fun and (relatively) easy to refurbish my bike, and while I'm sure I inadvertently did all kinds of things wrong, it all seems to have worked out in the end.

Wednesday, 28 November 2007

More Photos of the Peugeot


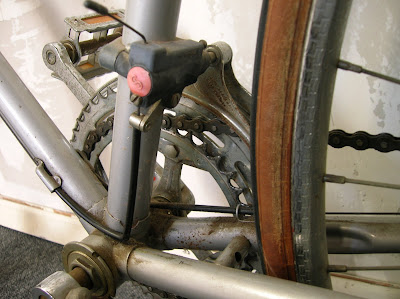
I took my customary before photos today, as much to show what needs work as to document where everything goes when I put it back together. Some of the photos here show the dirt, rust, and wear on the bike, others just turned out looking neat, so I put them up. I'll probably get started dismantling and cleaning this weekend.

Monday, 26 November 2007

A New Old Bike

Hmmm, well, I bought another bike (yeah, I know, this is how it starts). Actually, my father bought me an early Christmas present from 1,000 miles away. See, I was at a thrift store with my wife on Saturday (our version of Black Friday shopping), and I saw the bike sittin' there for $99, and it was on sale. I'd been wanting a road bike to use for exercise, since my Columbia is more for getting around town and less for longer-distance rides. I didn't buy it then, I just figured it was an unnecessary expense. But, I kept thinking about it, talked to my dad, and today went back and bought the darn thing for $69.99. My dad said it was the easiest Christmas shopping he'd ever done.

Here's the deal: from what I've been able to gather from the pundits on the web, it's a Peugeot UO-8, probably from the 1970s, although there seems to be some discrepancy with the serial number, which indicates it's from the 1980s. I guess Peugeot serial numbers can be a bit funky, and not always reliable to date the bike. This model was apparently imported into the U.S. in mass quantities during the 10-speed craze of the 1970s. It's not especially special, but it will get the job done. It's a steel frame, which I like, but it's still relatively light compared to my Columbia. I think it's a very nice-looking bike, although these pictures don't do it justice. I'll try to get some more up soon, but I ran out of batteries for the camera.

It needs to be cleaned up, the derailer needs to be adjusted, and the bearings might need grease. The cables look to be in good shape, but the brakes could be tightened up a bit and the shoes replaced. At some point the saddle and handlebar tape could also be upgraded, and the tires aren't in great shape, but they're fine for now. I'm NOT doing any painting on this one, but I'll chronicle my cleanup and have some "after" pictures.

Okay, Internet, I swear I'll only buy one more bike (for my wife), then I'll stop. Probably. Not. Oh, man...

Thursday, 22 November 2007

I know a place where no cars go.

I took a ride today down into Balboa Park, down to the Prado area--the pedestrian-oriented complex of museums near the San Diego Zoo. Since it is Thanksgiving today, I figured the roads would be pretty bare, and for the most part I was right. The picture above is at the intersection of Park Boulevard and Village Place. Park Blvd. is normally a very busy north-south thoroughfare through the park, but not today. There was some traffic, but not much. Once I got to the park, I was surprised to see quite a number of pedestrians strolling about, despite the fact that the museums were all closed for the holiday.

I saw joggers, bikers, pedestrians, people walking dogs, kids with scooters, you name it. Although I was kind of hoping for a post-apocalyptic level of quiet, I was also really pleased to see so many people eschewing the turkey coma and football stereotype that has become so common for this holiday.

It would have been a near-perfect ride, but for the fact that there is no good way to get from one side of Balboa Park to the other, unless you're driving a car. The canyon that runs through the center of the park is steep, and there are no sidewalks on Morley Field Drive, the main connector between the two sides. I made it about half-way up the hill on my bike before three speeds proved too few, and I had to bail out and haul my bike over the curb and onto the steep, rocky path that has been worn onto the shoulder (see photo above).

In terms of bike performance, I'm still getting used to shifting and getting the cable tension right. I had a couple moments of heart-thumping when the peddles freewheeled forward in second gear while I was in the middle of the street (one reason I wanted to go for a ride on the holiday). I think I've got everything adjusted now. Also, I charted my course on my Google map, which you can click at right.

Happy Thanksgiving, everyone!

Monday, 19 November 2007

On Doing It Yourself

I have rarely been so happy as when I looked at my finished bike for the first time and thought, "I did this." It was a big project for someone who had never done anything like this before, and who considers himself mechanically disinclined. But, I'll be danged, I did it. The whole project came out exactly as I imagined. I now have a bike that works better (like new, in fact) and looks better, and I did every step of the process myself. I learned how to cut and install new cables, adjust a Sturmey-Archer 3-speed shifter, make fine adjustments on caliper brakes, sand, prime, and paint a bike, grease and reassemble the crank, headset, and axle bearings. I took my time (boy, did I), and I made sure that I did every step of the process just the right way. I documented everything with photos and meticulously bagged and organized each part I took off. In short, although it took me four months to do it, I did exactly what I set out to do.

I don't share all this just to feel good about myself (but, heck, I do!), I share it to make a point. Whether it's fixing bikes or cars (preferable bikes), home improvements, gardening, cooking, art projects, crafts, whatever, if you do it yourself you gain something in the doing. Not just the result you were shooting for, but a sense of accomplishment, a sense of pride in workmanship, and a new set of skills and experiences. If you take a chance, try something you thought impossible, you might actually accomplish it, and although it sounds a little trite, there is no better feeling in the world. In the process, you gain a little confidence, a little independence, and ultimately, I think, a better sense of yourself.

Sunday, 18 November 2007

After Pictures (first of many)


Friday, 16 November 2007

IT LIVES! Mwaaa-ha-ha!

Two big revelations today: 1) I actually have a bike with three speeds now, instead of a three-speed bike that doesn't work right; and 2) I am dramatically out of shape.

Both of these came to me today while taking my bike for its first test ride. Let's focus on the first one. After much adjusting and fidgeting and swearing, I finally got the shifter cable adjusted properly (see Sheldon Brown's how-to section on 3-speed cable adjustment--it's about half-way down on the linked page.) The real bugger was getting it adjusted so that it wouldn't freewheel in the middle gear. I now thoroughly understand how to make such adjustments in the future. Thoroughly.

For the first year that I had the bike, I never noticed much difference in the three gears, and now I know that I probably wasn't even moving through the gears when I moved the trigger. Having all new parts (cable, trigger shifter, and indicator spindle) makes a huge difference, and knowing how they should be properly adjusted is essential. It's really a joy to ride now, especially with everything greased and oiled. I was hoping to notice a dramatic difference in the way it rode, but I had no idea it would be this dramatic! I wish I had done this as soon as I got it.

I've got a few more little adjustments to make on the brakes and a loose nut to tighten on the rear fender, then I'll polish it up with another coat of Turtle Wax and take some "after" pictures. I've also assembled an album of "before" pictures that didn't get posted. An "after" album will go up soon as well.

PS--check out my Google map to the right for the route of my test ride today.

Thursday, 15 November 2007

Putting on the Brakes

My task yesterday was to put the brakes back on, a somewhat daunting task because it involved my first-ever cable cutting. I was afraid I would somehow cut in the wrong place and have cables that were too short or some similar disaster, but that part went pretty well. I just used my old cables and housings as a guideline. The only problem came when I actually assembled the hand brakes and noticed that the metal caps the bike shop gave me for the ends of the new cables were too small for my hand brakes. I was able to reuse the plastic cap on one side, but on the other side, it had cracked. Using the new caps creates a problem because when I squeeze the brake, it moves the whole housing instead of just the cable on the inside, which is what actually works the brakes. I rigged a temporary solution with a washer and a piece of rubber I cut from an old tire, but I'm going to need a more permanent solution.

This is what it is supposed to look like. You can see that the plastic cap is designed to keep the housing from moving around when the cable is pulled with the handbrake.

And here's what I rigged up. First tried just the piece of rubber with a hole punched through it to let the cable work, but the rubber just got pulled through the opening in the handbrake when I squeezed the brake. I then added the washer to provide some resistance. The tightness of the cable keeps the whole thing in place and it seems to work well enough for now. Maybe I'll try to fix the other old plastic cap somehow. I guess a more permanent solution would be to just get new brakes altogether, but I am really interested in using as much of the original bike as I can.

PS--the black cable housings look really sharp against the dark red paint.

Tuesday, 13 November 2007

Arr, she's a fine lookin' craft, but will she sail?

That, more or less, is the question. I put the fenders and wheels on today and it was nice to see my bike looking like a bike again, instead of just a collection of parts. I have to admit, I was a little surprised at how good it looks. Damn good, if I may. If it rides half as good as it looks, I'll be happy.

I was a little afraid that when I put it back together, it would come out as something else entirely, like when the Simpsons tried to build a pool and built a barn instead. Then, the Amish guy says, "'Tis a fine barn, but sure 'tis no pool, English." Yeah, that's what I thought would happen.

Next, I'll put on the chain, the brake and shifter cables, the brake shoes, and chain guard. Then, make some adjustments and tighten everything down and I'll be done. I'm a little nervous about cutting and installing the cables, since it's pretty important and I've never done it before. 'Course, I guess I've never done any of this before...

Sorry about the poor lighting--I'm saving the really nice pics for when the whole thing is done.

Monday, 12 November 2007

Surprise! Reassembly!

I had planned on doing the second clear coat today, and even started on it, but the first piece I coated (the front fender) got all bubbly and cracked and spotty-looking. I think I must have put on a too-heavy coat, but I decided not to push my luck with the other parts. So, instead of doing two coats of clear coat on everything, I'm calling it good with just one. Tomorrow, I'll buff off the botched clear coat on the front fender and then try to reapply it more smoothly. I put a coat of Turtle Wax on everything else, which will also act a protecting layer. Then, I took off the masking tape from the bearing cups and head badge and started putting the whole thing back together. As you can see below, I got the fork and handlebars, the seat, and the crank put back on the frame.

Nothing too technical here. I just put the seat back on so I could flip the bike over later to work on the crank, fenders, chain, etc.

Here's how I put the fork and stem on: 1) pack the bottom bearings of the fork and set on the bottom bearing race; 2) insert the fork into the tube and let the frame rest on the fork; 3) grease the bolt and expansion wedge on the stem and pack the top headset bearings; 4) insert the stem into the tube and tighten the stem bolt.

Tips on the process: 1) don't tighten the bearing races too much, just enough to hold the bearings in the cups. If you tighten the races too hard, they won't turn freely; 2) same goes for the stem bolt; it should be tight, but not so tight that it affects the steering of the bike; 3) try to line up the fork and handlebars with each other and with the frame; you can fine-tune once the bike is ridable, but the straighter everything is now, the easier it will be to make fine adjustments later.

And then, the crank. Pretty straight-forward: pack the bearings and grease the cups, lightly tighten the bearing race on the left (non-chain) side, and put the hardware back on. Again, when you tighten the nut on the outside of the left side, don't make it too tight, as this will push the bearing race into the bearings and affect the turning of the crank. Remember, the nuts and the bearing race on the crank turn counter-clockwise so they won't spin off while you're riding, so they don't have to be made too tight.

So, there you go--clear as mud, right?

Tuesday, 6 November 2007

A Long, Strange Trip

Well, it wasn't that strange, but it sure was long. Three weeks is a long time to be gone when you're a homebody like me. I spent a good amount of time doing research in central Illinois, then another week in my old stomping grounds in Chicago, where I snapped the pictures below. There were so many old bikes around Hyde Park, I couldn't hope to snap them all, but I got a few. It was great to see so many of them being used. Of course, most of them, the chain was squealing, the fenders were rattlin', and the tires needed air, but they were being ridden, at least. Of course, they were usually being ridden on the sidewalk and through stop signs, but whatever. Soon enough, I'll get back to the clearcoat and then reassembly on my own little machine. Hoo-ray!

{that says SEARS, by the way}

Friday, 12 October 2007

Light at the End of the Tunnel

10/13-UPDATE. Arg. It's rainy and humid today--going to have to wait on that second coat of lacquer. I'm outta here for 3 weeks. See you in November!

Ah, the end is in sight! All my parts and tools for the reassembly have finally been purchased, and today I put on the first lacquer coat, or clear coat. With the exception of one area on the frame which dripped a bit, it went on really well. I had buffed out the paint to a dull matte finish as recommended before the clear coat, and I was really happy to see the clear coat bring back the gloss and deepen the color. For the buffing, most everything I read said to wet sand with extremely fine sandpaper, but that made me nervous, so I used my "0000" steel wool (dry) to do the job, and it seemed to work fine.

I'll do the second lacquer coat tomorrow (24 hours, says the can). Then, I'll be away from the project for about three weeks (got actual work to do). When I get back, the clear coat will be nice and hard and I'll buff up the finish with some car wax and start putting it all back together. We'll see if I can remember where everything goes!

PS--I'll be in Chicago for about a week coming up, and I hope to snap some photos of old bikes around the University of Chicago while I'm there to post when I get back--love to see old bikes getting used!

Thursday, 4 October 2007

Thoughts on a Quiet Revolution

Wired magazine today covers Interbike 2007, the bicycle industry's annual big hoopla trade show, and refers to a "quiet revolution" away from the high-end, high-performance road bikes and mountain bikes that were so popular during the 1990s and early 2000s. People have realized that getting about in the city is easier on a simpler, more comfortable ride rather than a mountain bike with fourteen kinds of suspension or a road bike that practically forces you to ride like you're in The Tour. The article cites the recent rise of fixed-gear bikes especially, with narrow handlebars for zipping through traffic, and even (gasp) fenders to keep you dry.

But who's fueling (ha!) the trend in fixed-gears? It's hipsters with iLives and no discernible source of income with which to buy these increasingly expensive bikes. Soon (if not already) the yuppies or yippies, or whatever, will turn in their mountain bikes they never take to the mountains and their racing bikes they never race with and buy a fixed-gear, some cropped bike pants, and a messenger bag and think they're the bee's knees. And bike manufacturers will be happy to jack up the prices on these simple machines as the demand skyrockets, making the fixed gear or urban commuter just as expensive and exclusive as the mountain bikes and racing bikes. It's already happening. It is a bicycle industry after all, and there's money to be made.

My humble suggestion: if people want a comfortable, reliable bike that's good in the city (and reasonably priced), go old. There are hundreds, if not thousands, of old bikes out there in barns and garages, just waiting to be fixed up and put back on the road for fairly minimal cost and effort. In the process, people can learn something, accomplish something, and get a truly personalized and unique bicycle in the end. I applaud the idea of a "quiet revolution", but if it's really going to be a revolution, it should be guided by people in their own garages with wrenches in their hands, not by the bicycle industry.

PS--The logo above is adapted from Revolution Cycles in Madison, WI, which hosts We Are All Mechanics, a group devoted to demystifying bicycle repair, particularly for women. I am not affiliated with either.

Wednesday, 3 October 2007

This is Very Cool

File this under: "A Complete Waste of My Time Today"

If you'll take a gander at all the do-dads on the right of your screen, you'll notice my new Google map. I created this to chart the many bike rides around the city that I expect to be taking once my bike is up and running. So far, it's only got the ride around the block I took before deciding to dismantle my bike in July, but I hope it will have a lot more soon.

Tuesday, 2 October 2007

Grumble

Okay, so I'm not a "bike guy." I know this, I'm okay with it. Why then, does going to a bike shop always make me feel like a second class citizen? I've been to two shops in two days looking for the last components, tools, etc. for my bike. Here's how it went.

Bike Shop#1: I went here to get my front rim trued, and to pick up new brake cables, bearing grease, cable cutters, tires, and tubes. I walk in the door with my front rim in my hand. Two employees look at me, turn away, and go back to what they were doing. I was less than five feet from both of them. I lingered near the front, near one side of the counter, trying to catch somebody's eye. When someone finally greeted me, I asked if they could true my rim, and asked about the other items on my list. All they had was the tubes, tires, and cables, and I was told to leave my rim until the next day. Fine. I'm told to call ahead to remind the guy to do the job, however, so that it's done by the end of the day. What? Why should I have to call to remind them to do their job? I'm irritated, but leave the rim anyway to pick up today.

Bike Shop #2: I went here to get the grease and cable cutters. Big bike shop, known throughout the city as one of the best. I didn't bother to call ahead, I was sure they would have what I needed. I walk in, the guy at the counter is on the phone. He asks if he can help me. Actually, he looks at me with the phone cradled on his shoulder and says, "Yeah?". Is he talking to me, or to the phone? It's me. "Do you have bearing grease or cable cutters?" I ask. "Nope, sorry," he says. I'm a little shocked. "Okay, do you know a place that does?" I ask. "No." Then the phone conversation starts again. I go home, get online, and find at least three places in town that seem to carry the stuff I need. Why didn't Phone Guy tell me about them? He didn't even think about it, or offer to look it up for me. I guess if I don't want to drop $500 on a new fixed-gear, I'm not a very valuable customer.

Gah. This is why ordinary people who want to do their own work on their ordinary bikes are put off and intimidated by bike shops and bike people, and honestly I think contributes to why we don't see more people on bikes. It's just assumed that there's this cult of bike knowledge and you have to be initiated to even get noticed when you walk into a bike shop (again, unless you're willing to drop hundreds or thousands of dollars on some high-end bike that you don't have the first clue about how to maintain). Democratize knowledge, democratize access, and people who feel left out will begin to participate.

Maybe I should go look at my stencils some more. That'll make me happy.

Monday, 1 October 2007

The Stencils Turned Out Great!

I'm actually a bit shocked at how well they worked. I was going to wait until everything was put back together to post more pictures, but they turned out so well, I had to show them off. There are some edges that need smoothing and touching up with the red paint, but all-in-all the stencils worked better than I had thought they would. I've still got to do the insides of the letters on the chain guard, but I'll do that next week when I do the red touch ups.

Here's the rear fender with the "safety" stripe on the back--wasn't on the original paint job, but I like the way it looks on some of the old English three-speeds, so I stole it.

This is the modified fork motif. It used to be just the upside-down arrow design (which had all chipped off, leaving just the outline of where it had been), and I added the star from the chain guard to give it a little more character.

And here's the chain guard sans insides of the letters. The original had two stars, but I decided to go with just one, seeing as how I already added two to the fork. This is a bike, after all, not a My Little Pony.

With the touch ups left to do next week, it's going to set me a week behind again. This means that I probably won't get the clearcoat done until early November, since I'll be away for three weeks in October. Oh well, can't rush greatness.

PS--I finally figured out how to embed photos within the text in Blogger, so that's exciting. Durr.

Sunday, 30 September 2007

LIYANG ALUMINIUM SERIES AL-550

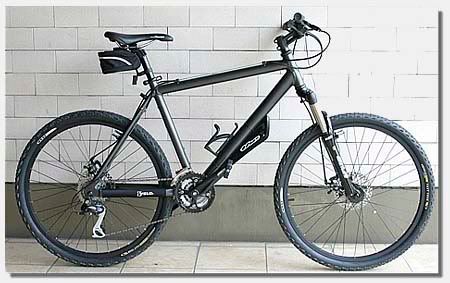
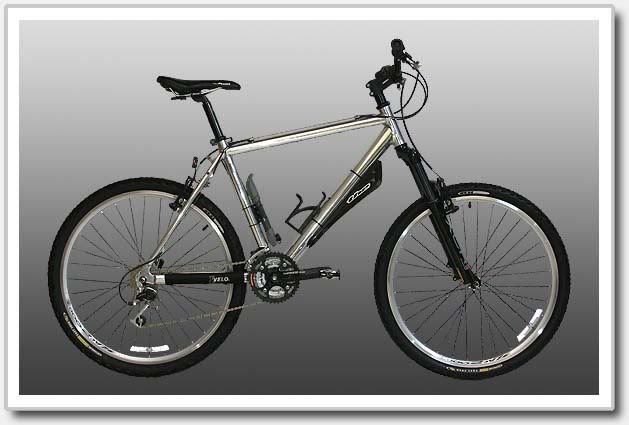
    PALING DISAYANG. Liyang adalah brand mountain bike buatan Taiwan pertama yang masuk pasaran USA. Mungkin atas pertimbangan komersial, Liyang masuk Indonesia dengan brand "Master". Pada masanya, Liyang Aluminium Series termasuk frame oversize yang paling ringan, karena pasaran sepeda Indonesia saat itu masih didominasi frame ukuran standard dari bahan besi dan chrome-moly.
        Sepeda ini dirakit pertama kali tahun 1991 dengan groupset Shimano Deore 300-LX, dan berat keseluruhan hanya 10,5 kgr (Mk-1). Nasib menentukan lain, frame dicat dan dirakit ulang tahun 2006 dan kembali merambah medan cross-country (Mk-2). Masih dipertahankan, karena merupakan kesayangan diantara semua koleksi sepeda kami. Sangat nyaman, stabil dikendarai, dan untuk masa kini terhitung masih cukup ringan. Sungguh merupakan sebuah perjuangan untuk merakit kembali sepeda ini dengan parts masa kini, karena geometri frame yang sudah lewat jamannya.
       Akhirnya tahun 2007 cat dikelupas (polished) dan tampilan berganti, seiring dengan difungsikannya sepeda ini untuk commuter, untuk dipakai bagi kegiatan sehari-hari (MK-3). Beberapa parts terutama drive-train kembali menggunakan beberapa produk lama. Jadilah sepeda yang sudah mengarungi beribu-ribu kilometer ini tetap menjadi pekerja keras.

Mk-1 (1991)

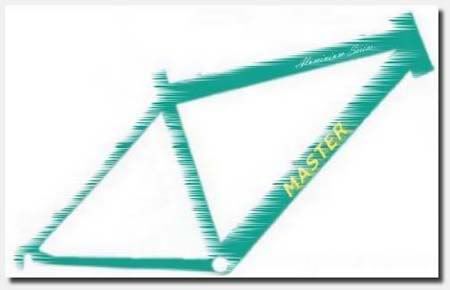
Liyang Mk-1


Mk-2 (2006)

Liyang Mk-2


Mk-3 (2007 sampai sekarang)


Spesifikasi :
Frame : Liyang Al-3000 Aluminium Series
Frame year/First built : 1991
Last built : 2007
Frame type : hard-tail (originally rigid)
Frame size : 18 inch
Utility : Commuter
Color : aluminium exposed

Forks : RockShox Pilot XC-Air
Front derailleur : Shimano Alivio FD-M410
Rear derailleur : Shimano Exage 300-LX RD-M300
Shifters : Shimano Deore XT 7S 2nd. generation SL-M732
Crankset : Shimano Deore Hollowtech FC-M530, modified to 42T/32T/22T
Cassette : Shimano Deore XT CS-HG70 (7-speed)
Chain : Shimano HG-53
Bottom bracket : Shimano Deore BB-ES30
Pedals : Wellgo LU-998
Brakes : Shimano Deore BR-M530S (V-brake)
Brake levers : Tektro Sensir
Handlebar : Amoeba Borla
Stem : Zoom
Grips : Velo D2 VLG-609
Headset : non-branded
Seat post : orig.
Saddle : Velo Plush
Hubs : Suntour XCR (front), Shimano Deore XT RH-M732 (7 speed)
Rims : Weinman ZAC-2000
Tires : Schwalbe Racing-Ralph
Cables : Jagwire 4.0, Shimano
Accessories : Lotus (bag), Cateye (bottle cage), Eiger (tail light), Velo (chain guard), THE Sports-Line (shroud), THE cable-pros


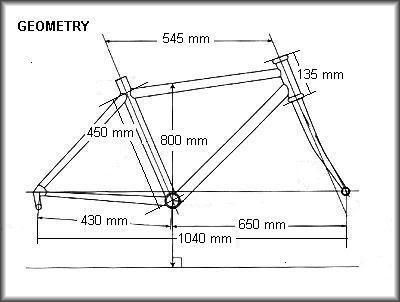
Geometry

Liyang logo


Friday, 28 September 2007

E-x-cellent!

Mwa-ha-ha! My plans are coming to fruition! Don't know why they seem to be evil though...

My new shifter, cable, and indicator spindle arrived today from Harris Cyclery. Great turnaround in the shipping, by the way--just four days from the East Coast to Sandy Eggo. Now I just have to get to the bike store to get some bearing grease, new tires and tubes, new brake cables, a quick-release front axle (maybe), a cable cutter, and get my front rim trued. Oh, front rim, why aren't you true?

White paint/stencils this weekend!

Sunday, 23 September 2007

Paintin' the Townie Red

I finished the last coat of red paint this afternoon! Some of the rough spots from the last coat have been smoothed out, but there are still some places I'm not completely happy with. Oh well, I'm sure nobody but me will ever notice. Now I'll wait five days (as per instructions on the can), and then do the white paint, including stencils. Then another five days before the clear coat. Then the painting will finally be done. I'm holding off on posting pictures for now, just to heighten the suspense for when the "after" pictures are ready.

Thursday, 20 September 2007

Ow.

Well, I didn't get that last coat of paint on yesterday. And then last night, I decided to go for a jog around the neighborhood. The neighborhood without streetlights. And mostly-even sidewalks, except for this one area, where I tripped and took a nose-dive. Ended up tearing a pretty deep hole in my arm that looks strangely like a gun shot, and getting a bunch of other scratches and scrapes. I'm an idiot. "Maybe you should run in the daytime," says my dad. Yup.

So, I'm going to let that heal for a few days before I get back to painting, since it just happens to be my paintin' arm. Moral of the story: running sucks, ride an old bike!

Wednesday, 19 September 2007

To Paint or Not to Paint?

Well, obviously, I've chosen the former, but in the process of researching how to paint a bike, I've come across a lot of old bike people arguing that one should NEVER re-paint an old bicycle, so I thought I would offer my thoughts on the subject. The people who argue against painting (or at least painting it yourself) seem to be the collectors and aficionados--the ones who horde bikes in the garage and periodically set them all up in the driveway to look at them. They also seem to be the ones who derive much of their self-worth from flaunting their superior knowledge on various online discussion boards.

Their argument is this: there is only one "original" coat of paint, and if you strip it off or cover it up, you devalue the bike. I can see the point for rare and unique models, or especially antique bikes, but for the mass-produced late-model older bikes, I don't really get it. It's like an old house; you don't keep the original paint on the house, right? You repaint it, and sometimes frequently. Doing so protects the house and makes it looks better. And why hire a painter when paint and brushes are readily available? You save money and get the satisfaction of doing the job yourself.

My wife is a rare book librarian and I'm a historian, so believe me, I appreciate the value of a pristine historical artifact, but many old bikes are not historical artifacts. They are working machines that should be used and enjoyed. If a new coat of paint (done right and done yourself) is what it takes to enjoy your old bike that much more, then I say go for it!

And speaking of paint, I think I'm going to put on the last coat of red today. I'll update when and if I get it done.

Monday, 17 September 2007

More Before Pictures


While I'm working on the paint, I thought I would post a few more "before" pictures that I found the other day. These were taken about a year ago, I think, a couple months after I bought the bike. Right after I took these, I painted the underside of the seat, rubbed the rust off the front rim, and removed the remains of a reflective sticker from the rear bumper. I'll post the after pictures of the same parts when I'm done with the whole project. A little cosmetic work goes a long way.

Saturday, 15 September 2007

On the Virtues of Old Three-Speeds

The following comes from a reader and group administrator for the 3-Speed Bicycle Lovers Group on Flickr. He wrote me a few weeks ago after I posted a photo of my bike to his group, and I've been meaning to post part of his email here ever since. "Hank" does an excellent job of expressing the utility and simplicity of these bikes:

"Old 3-speed bikes are built like tanks, and the Sturmey
Archer hub is a nearly infallible gearing mechanism. In
Boston where I live you see a lot of these bikes still
running. Dealers in town can easily sell one of these bikes
in good shape for as much as $200 to $300. I'd rather find
one for cheap - it's not too hard!

In my opinion an old 3-speed is the perfect everyday bike
for riding through the city. When I have a passenger side
mirror to my left and a row of parked cars to the right,
the narrowness of the North Road handlebars have enabled me
to squeeze between them, which is something you could never
do with a mountain bike or a cruiser. Also if need be, I
can switch gears when I'm at a complete stop. If I get
caught in the rain the fender keeps my back dry. They are
comfortable too as I am in an upright position when I'm
riding. Maintenance is fairly simple as well. Enough of my
ranting and raving...

Good luck with your bike. I hope to see more photos when
you're done fixing it up. May it bring you years of good
use! Thanks again."

Hank, thank you! More thoughts and postings on old bikes to come, and of course, more updates on my progress.

Change Is Good

Yeah, okay, I changed the layout again. I think I'm going to try to settle on this one for a while, maybe make a few more minor changes, but basically leave it alone. Since this week's big activity with the bike is letting the paint get nice and dry, there isn't much else to do. It's like watching paint dry. Really.

Also, I've been kicking around some ideas about what to do with this blog after my bike is finished. My wife needs a new bike, so maybe I'll have another project to work on. I've also been thinking about just a general catch-all for old bike stuff, but I don't know how interesting that would really be. The other option (perhaps in combination with the first two) is to give voice to some of the reasons (ideological, practical, aesthetic, recreational, etc.) that motivate my interest in old bikes. I'm not a collector (although I can see the attraction), I'm not an aficionado, and I'm not a gear-head. So, why old bikes? Maybe I'll get around to answering.

Sunday, 9 September 2007

First Coat of Paint

WooHoo! I got the first coat on today, with pretty good results. I actually did two coats, spaced about 1 hour 45 minutes apart (as per the instructions on the can, which said to re-coat within two hours or wait 5 days). This photo is after the first coat, and the second coat darkened quite a bit and got a nice shine. My plan now is to let these first two coats dry for a few days (probably about a week), then buff everything with the "0000" steel wool very lightly and then do a third coat. Then I'll do the white parts (the lettering on the chain guard and the designs on the fork with the stencils, and also the back of the rear fender). I'm hoping that's going to do it for the paint. Then I'll let that sit about a week and do the clearcoat. By that time, I should have my new parts and be ready to put everything back together.

Ping Blog

Step 1
Blog URL:


Blog Title (optional):


Blog RSS Feed (optional):


I agree with terms of service.

Step 2
Copy the following code and put it on your blog/site to help our blog ping tool track your submission (Need help?):
;

 
Design by Free WordPress Themes | Bloggerized by Lasantha - Premium Blogger Themes | Best Buy Coupons