Tuesday 31 July 2007

GIANT ANTHEM S

Ticket to Ride       MANA TAHAN............ Sepeda produksi 2006, ini salah satu yang dibeli dalam bentuk full-bike. Memang sengaja ambil yang entry-level dari Giant Anthem (S), karena lebih ekonomis beli dalam bentuk full-bike dibanding beli frame saja. Sampai saat ini tinggal seatpost dan rear suspension saja yang masih orisinil, lainnya mana tahan sudah up-graded.
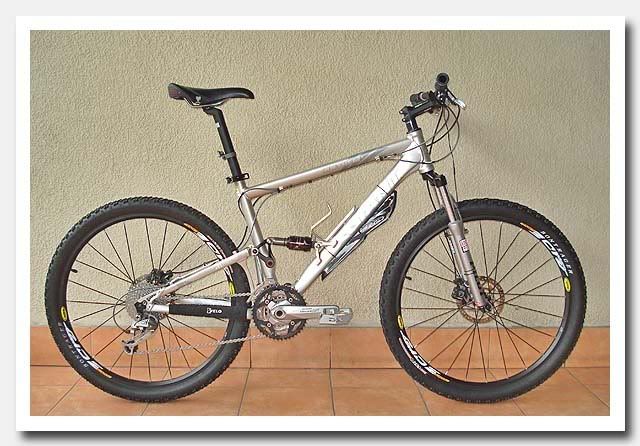
Giant Anthem


Spesifikasi :
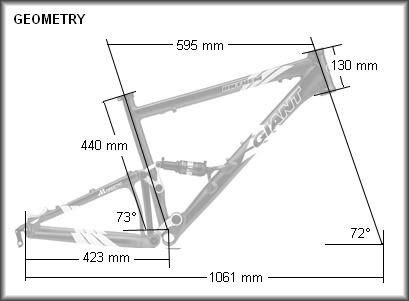
Frame : Giant Anthem S
Frame year : 2006
Frame type : AluxX SL low-multipivot full-suspensions
Frame size : M (18 inch)
Color : blue silver
S/N : GR606996

Forks : RockShox Reba Race DualAir w/ remote lock
Rear suspension : Giant Maestro-A
Front derailleur : Shimano Deore LX FD-M580
Rear derailleur : Shimano Deore LX RD-M580
Shifters : Shimano Deore LX SL-M580
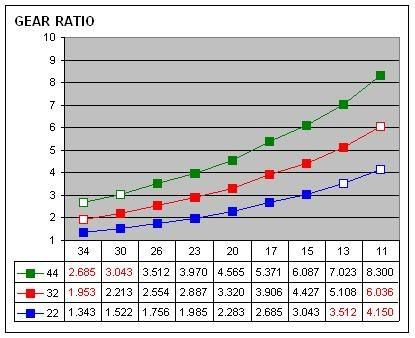
Crankset : Shimano Deore LT Hollowtech-II FC-M580
Cassette : Shimano Deore XT CS-M760
Chain : Shimano Deore XT CN-HG93
Bottom bracket : Shimano Deore XT
Pedals : Shimano DX
Brakes : Shimano Non-Series BR-M520 mechanical disc w/ 6 inch rotor
Stem : Maxm SL-Series
Handlebar : Maxm Al-5
Grips : Odi Ruffian MX
Headset : TH Industries Aheadset
Seatpost : Giant SP-D281
Saddle : WTB Rocket-V SLT Black
Wheelset : Mavic CrossRide Disc
Tires : Bontrager XR-Jones
Cables : Shimano XTR
Accessories : Cateye Enduro8 (cyclocomputer), Topeak (saddle bag), Topeak TC-2228B (handy-phone pack), Velo (chainstay-guard), Minoura (bottle cage), THE Pro-Series (shroud), Topeak (pump), Giant Quark-5 (head light), Giant Charm-3 (tail light)


Geometry

Gear Ratio

Giant Logo

Bike-Saw Puzzle

It's been a few days since I've had a chance to get back to the bike, so today I did a bunch of stuff. I was only planning to take off the crank, but then I realized that I didn't have a big enough wrench (isn't that always the way?). So, instead, I took off the wheels, chain, kickstand, and fenders, which I then arranged artfully and took a picture.

While I had the bike upside down, I wiped off the accumulated dirt in preparation for the really thorough cleaning I'm going to do before sanding down the bad spots on the paint. I'll head to the hardware store this weekend for a bigger wrench and finally get the crank off, and maybe the stem as well. It's starting to get interesting.

Tip: When I tried to remove the rear fender, I found that the screw holding it to the frame was rusted tight, so I sprayed a little WD-40 on it and let it sit for about ten minutes. After that, it turned quite easily. This is the only time you should use WD-40 on a bike--never lube the chain or gears with WD-40. The problem is that WD-40 is formulated to resist water (WD=Water Displacement) and stay on whatever you put it on for a really long time. The longer it sits on your chain and gears, the more gunk gets stuck to it, and the gummier everything becomes. Use a specialty bike lube from your local bike store for your chain and gearing mechanism.

Friday 27 July 2007

Shifty Shifter


Yesterday, I disconnected the shifter and took it off. The bike is now cable-free, like the fixed gears you see all over the place these days. I actually like the clean look, but I'm not willing to give up gears and brakes to get it.

The picture on top is the shifter that was on there. Note the rust, broken plastic, and the cable casing that has peeled away. The cable itself is also in pretty sorry shape down near the indicator spindle (look at me, showing off the internal gear hub lingo--it's the little chain that comes out of the right side of the hub).

The picture on the bottom is the new trigger shifter and cable I'm going to order from Harris Cyclery. One thing to note is that my original cable isn't adjustable like the one shown here, which can be trimmed to fit, then the anchorage added. Since I'm not attempting a completely authentic restoration, the universal cable and the more modern-looking shifter don't bother me, but if you were doing a hard-core restoration, you can still get the original cables at Harris Cyclery, although I think their quantities are limited.

Thursday 26 July 2007

Old Bike Photos on Flickr


Here are three Flickr photo groups that I just discovered today, which focus exclusively on three-speeds and/or vintage bikes. They're a great resource for anyone working on one of these machines. I promptly posted a photo of my bike (above), so hopefully some of the group members will follow me back here. If you are one of those folks, welcome. Feel free to offer unsolicited advice and/or encouragement.

Wednesday 25 July 2007

"Before" Paint Detail


Here are some "before" pictures of the rough shape the paint is in.

Nothing too exciting today. I removed the rear brake assembly and discovered that it was even dirtier than the front brake assembly (see yesterday's post). So that was fun. It is very satisfying to clean all the parts, though. See if I still feel this way next week.

Tuesday 24 July 2007

Everything is Dirty


As in filthy. Grimy. Gross. Accumulated road guck.

I took a little break from work at noon today (I work at home) while my lunch was warming up, and removed the front brake assembly. I'm doing everything incrementally, one step at a time, because I'm not at all confident in my ability to remember where everything goes. I'm taking pictures of everything as I do it for later reference when I try to put it all back together, then bagging everything in labeled plastic zipper bags. I know, it sounded anal to me too when I read this bit of advice online, but so-help-me, it has SO helped me. I'd never remember where all the little washers and nuts and doo-dads go if I didn't label everything.

The main point of all this is that every piece that I take off is really dirty. I clean up the surface of everything fairly regularly, but I've never delved into the guts of the bike, and as I'm doing that, I'm realizing how filthy everything is. I'm also realizing that whoever had this bike before me did a lot of "improvising" when it comes to little parts. There are a lot of washers that don't seem to fit quite right, some nuts that are cross-threaded on bolts, etc. Anyway, I haven't cleaned the parts I took off yet, maybe tonight. Then I'll really know how dirty they were. The photo above gives some idea of the grime.

Monday 23 July 2007

"Before" Pictures


This is my project bike. It's a 1971 Columbia Sports III with a Sturmey-Archer 3-speed hub. It's not really all that special, I guess, but it's a real workhorse. And I really like the styling--straight lines, upright seating, almost a European look. To me, the style looks older than it really is, with reflections even of pre-1920s bikes.

These are the ultimate "before" pictures. They were taken over a year ago by the previous owner of the bike. Actually, these were the images from the original Craig's List posting. I've done some stuff since then in the way of cleaning it up, general maintenance, and some minor cosmetic stuff (like painting the rusty underside of the seat), but it basically still looks like this. The paint used to be a deep cherry red, which you can still see on the inside of the chain guard and in some spots on the frame, but in many places it has now faded so a sort of sickly pink color. The rear fender is really bad, almost a salmon color in some light. The paint is also badly dinged and scratched all over, and there's some surface rust. The cables all look to be original, and are in bad need of replacement. The trigger shifter is also in pretty sorry shape, and it's preventing the gears from shifting the way they should. When I ride it, I just keep it in the middle gear.

In terms of what I'll be doing (or trying to do), I don't really see this as a "restoration" project, because my goal is not really to bring it back to mint condition. I have no interest in the original decals, for instance, and it won't bother me at all that the new shifter will look a little more modern. I see this as more of a "refurbishing" to get the performance and look of the bike back up to where it should be. This is my bike, I use it, and I want it to work properly. I'm doing the work myself because I believe everyone should be able to fix and maintain their own bike. At the very least, they should know how it works. I'll admit that I don't really know that much right now, but I want to learn, and what better way than to get my hands dirty? Basically, I'll be taking the bike apart, piece-by-piece, cleaning everything, oiling and greasing the parts that need it, repainting it, and putting it all back together (God willing and the creek don't rise).

I'll have more "before" pictures as I go, and I'll take pictures of every step in the process. I'll also probably rant about various roadblocks (where is that squeek coming from? how can I stop it if I don't know where it's coming from?), and "challenges" that inevitably crop up with this kind of project. You will delight in my misery, but hopefully also get to enjoy the fruits of my ultimate success with me.

Ping Blog

Step 1
Blog URL:


Blog Title (optional):


Blog RSS Feed (optional):


I agree with terms of service.

Step 2
Copy the following code and put it on your blog/site to help our blog ping tool track your submission (Need help?):
;

 
Design by Free WordPress Themes | Bloggerized by Lasantha - Premium Blogger Themes | Best Buy Coupons