Saturday 30 August 2008

The Runwell Preview


Just a couple of teaser photos after a busy Saturday of work. Had a successful trip to the bike shop this morning and picked up most of the remaining essentials. Still have to place an order with Harris for the remaining, and to finish up a good deal of the "cosmetic" work. Unfortunately, along those lines, these photos show the limitations of my cleanup effort, especially due to deteriorated nickel and/or chrome plating and a bit of rust still showing on the frame. Oh well, still better than when I found it, for sure.

Friday 29 August 2008

The Runwell: Day, Uh, 13? 14?

Honestly, I've lost track of the days. I've been working on sanding/chipping the old paint off the fenders, and priming, painting, and top-coating them. I'm about half-way through that process now. I also gave the frame a rubdown with rubbing compound, which really brought out the shine and deepened the color. No more pictures of the frame or fenders (well, maybe the fenders) until I'm all done--don't want to spoil the suspense!  

My cork grips from Velo Orange arrived yesterday, and I promptly set about cutting them down so they would fit on the Runwell's smallish handlebars. Because I lopped about two inches off the end of each grip, I was left with open-ended grips that needed bar plugs (it was an aesthetic choice not to take the two inches off the already-open end of the grips). To match the color of the cork grips (and boost my DIY cred), I whittled two plugs out of some scraps of 1" wooden dowel I had laying around. 

I'll varnish these separately, then put the grips and plugs on the bars and varnish them both together to create a good water-tight seal. I'll be running to the bike shop this weekend to hopefully get my tires, tubes, rim tape, chain, and new spoke. Then, it's an order from Harris Cyclery of rod-pull brake shoes, new block pedals, and perhaps a new seatpost (to replace the original angled post that seats me too far forward). Once all that is assembled, I'll give the frame a couple coats of polish and I'll be done. I won't say when that will be, for fear of jinxing the whole operation, but soon, I hope.

Wednesday 27 August 2008

That Must Be Heavy!

Those of us who ride old bikes are used to hearing this phrase, frequently spoken by spandex-clad "scorchers" (as they used to call speeding cyclists) nodding derisively at our old three-speeds or cruisers. I usually say, cheerfully, "Yup!" and toodle off down the street on my "clunker." Well, if it makes you feel any better, here's a quote from School Recreations and Amusements (1896) that advocates, quite sensibly, a heavier bike:

Except for track riding or racing, do not make the mistake of getting too light a machine. The wheel that is to stand the roughness of country roads and the unevenness of city pavements, that is to be solid, reliable, and trustworthy in all conditions, must have some weight. For road work, twenty-four to twenty-eight pounds is a convenient weight. 

The volume (the title of which does a disservice to its contents) also goes on to say:

The common rule of life seems to be hurry and rush, making work (and hard work) even out of our pleasures; but in the case of bicycle trips for pleasure, no course could be more unwise. Do not attempt to make so many miles a day. Stop when you like. Enjoy all that you can in the way of natural scenery or observations of life, and thus store up a host of pleasant recollections for after years.

Good advice in 1896, good advice now. Read the rest at Google Books.

Tuesday 26 August 2008

Reader Projects Gallery

Now that we've had a few Reader Projects features, I've put together a little gallery of the "before" pictures and added a cool little slideshow gadget in the navigation bar to the right. Just click to view the gallery, also available here

Right now, I've just got the full side-view photos of the projects up, but if readers would prefer, I can add all the detail shots, too.  What do you think?

Also, if one of your bikes has been featured here, and you've since finished working on it, send me the after photos, too, and I'll post an update and add them to the gallery. And, of course, if anyone else would like to have a bike featured as a Reader Project, I'd love to have it. Just send me an email with a few photos (before or after) and a description of what you'll be doing/did to get it fixed up.

Monday 25 August 2008

The First "Issue" of The Cycling Gentleman Is Up!

The first few posts are now up at my other blog, The Cycling Gentleman. Included in this "issue" are reflections on the consistency of trouser clips, an bit of fashion humor from the cycling past, the failure of BMW to make cycling unattractive, and a sporty fellow spotted in Boston. 

Go check it out, I'll wait here. It's okay, go on...
 

Friday 22 August 2008

The Runwell: Days 11 & 12

After one day spent badly bungling trying to re-lace my rear wheel, an evening carefully studying Sheldon Brown's guide, and another afternoon finally getting the stupid thing right, I can now say that I've built a wheel, or rather rebuilt a wheel. Once I actually pulled my head out of my...well...and thought about it for a minute, it all went pretty well, with the exception that I stripped a nipple (cue childish snickering) that's going to have to be replaced and the wheel trued.

I also greased and reassembled the rear hub, and now have a functional rear wheel that's in much better shape than when I found it. Here's the before picture for a comparison.
 
I've even tested the coaster brake by spinning the wheel in my hands, and it seems to work just fine. Like I said before, it's not quite as shiny as I would have liked, but there's only so much one can do after years of weather. 

On a side note, after exchanging emails with a very nice gent and former mechanic in England (who remembered when Runwell was still around in the 1960s as a smallish parts distributor), I believe I'm dealing with what's left of the original nickel plating, rather than chrome, which does a little more to explain why it was so badly deteriorated. Chrome was apparently introduced in 1928, but nickel plating was still applied after that date, so it remains hard to pin down exactly when my bike was manufactured.

New Blog: The Cycling Gentleman

A friend of mine once described his family as "a project-oriented people"; well, I guess that goes for me, too. Because I don't have enough to do with a dissertation, several articles, and a book-length editing project in the works, I've decided to launch another blog. This one is called The Cycling Gentleman and I'll let my alter ego explain what it's about:

The Cycling Gentleman follows the trend of sites like Chic Cyclist,Copenhagen Cycle Chic, and Urban Cycle Chic in presenting and advocating everyday bicycle fashion. Unlike these sites, which tend to focus primarily on female cyclists, The Cycling Gentleman presents cycling style strictly from a gentleman’s perspective. Why only gentleman? Frankly, we need the most help! In addition to combing the interwebs for examples of stylish modern-day Cycling Gentlemen, I will also be posting material from the cycling past to inspire and inform.

Wednesday 20 August 2008

Reader Project: RB's Raleigh Superbe

Long-time reader, first-time "Reader Projects" contributor, RB of A Balanced View brings us his most taxing (and interesting) current project, a 1951 Raleigh Superbe Dawn Tourist. I've excerpted a very small amount of text from his blog below, but it's really worth following the link to read RB's more extensive description of the work he's doing on this bike and his other projects.  

As far as I can tell, this is a Raleigh Superbe and the frame number - a “P” number stamped at the top of the seat tube -  suggests it was built in 1949 or 1950, at least according to the online sources here and here. The rear hub is a Sturmey Archer DynoFour -the date code appears to be “5T” which suggests (to me, at least) 1950 [editor's note: since writing the original post, RB has tentatively dated this bike as a 1951 Raleigh Superbe Dawn Tourist]. When I acquired it, it looked as if it had been attacked by a maniac armed with a floor mop and a bucket of green household paint.

There are lots more pictures of RB's Superbe at his blog, including some really horrifying close-ups of the paint "job" and some really wonderful ruminations on the chicken-shaped spoke reflectors that somehow found their way onto the bike.

The Runwell: Days 9 & 10

Despite my recent disappointment at the utter failure of Menotomy's "Vintage Bicycle Cleaning Kit" (grrrr), I've been plowing ahead with the rear wheel cleanup. Unfortunately, although it is certainly better than it was, I have had to settle for an "antique patina" finish rather than shiny chrome and steel. The chrome is simply wasted after years of rusting outside. As a testament to the heartiness of the old construction, everything is still structurally sound, just cosmetically ruined. I'm still pressing on with my plan to get the bike back up and running before thinking about repainting and re-chroming (after all, I've not even ridden the thing yet), but someday down the road, I'll do both. Until then, no riding in the rain (not hard in SoCal). Here's the after picture of the outside of the rear hub, with the Perry mark relatively clear. The shiny strip is the result of being covered by the dust clip for so many years. Below is the before picture, so you can see that I did accomplish something. Right now, I still have the wheel completely taken apart, and everything is clean (if not shiny). I've never taken apart or reassembled a wheel before, so I'm advancing with trepidation, but I have faith that I'll be able to figure it out. I only attempted it here because the single-speed wheel on the Westwood rim is built without a dish because there is no derailer and gear cluster to compensate for, making it a much more straightforward build. For those who are interested, the rear rim is a 40-spoke design, typical of old English bikes, but not otherwise very common.  I'm going to hold off posting a "how to" about reassembling the wheel until I see if I actually "can do," but check out Sheldon Brown on wheel building in the meantime. Once the wheel is back together, both wheels and the frame are off to the bike shop for truing and to have the cottered cranks and stubborn stuck pedal removed. Once that's done, I'll just need to assemble all the replacement parts, and put 'er back together. I'm sure it won't be that easy, however.
 

Monday 18 August 2008

Product Review: Menotomy's "Vintage Bicycle Cleaning Kit"


Everyone with an old bike and an internet connection knows about Menotomy Vintage Bicycles at OldRoads.com. Their discussion forums, serial number charts, photo database, and price guide (among many other terrific resources) are invaluable to people who are researching and restoring old bikes. They also sell a "Vintage Bicycle Cleaning Kit" for $21.95 (plus shipping) that is supposed to be the product of years of hands-on experience working on old bikes. The kit is composed of two "spoke sticks," a single pad of copper wool, and a bottle of "Menotomy Mixture," a special formula for cleaning rust, grime, etc. off your vintage bicycle. I've had my eye on the kit for a while now, but didn't figure I needed it until working on the Runwell's rear wheel, which is badly rusted, although I don't think it's structurally compromised.

I ordered the kit a little over a week ago, and it came today. I immediately went out and started working on the rear wheel, following the enclosed instructions, but it was shortly apparent that I had been had. The flimsy "spoke sticks" (so-called because they are supposedly specially designed to get between spokes) are oddly reminiscent of tongue depressors or popsicle sticks, and are actually quite inferior. The copper wool, which you can buy at any hardware store, was shredded and useless after about 30 minutes of work, and the special "Menotomy Mixture" appears to just be a light oil (I don't doubt that it's got other stuff in the "mix," but the results were the same as if I had used only light oil). 

The kit did remove some of the surface rust from the rim, but did not give me the deep clean or shine I had been led to expect. What's more, my earlier foray into cleaning a small spot of the rear rim with rubbing compound and fine steel wool was actually more successful than anything I was able to accomplish with this kit. In some areas of the inner rim, the mixture and the copper wool did produce results, but again nothing different than I was able to accomplish with rubbing compound and steel wool. 

Let me be clear: I am not criticizing the Menotomy kit for failing to shine-up my rim (which was, admittedly, a tall order), but rather taking Menotomy to task for representing their product as unique and specially designed for this kind of work, when in fact, ordinary products that are inexpensive and readily available produced better results for an equivalent amount of money

If you're working on an old bike, you don't need this kit. Go to the hardware store and buy some fine steel wool, a bottle of light oil, some rubbing compound, and maybe a can of Brasso or Barkeeper's Friend. Oh, and some popsicles, at least you'll get to eat them before using the sticks. I'm sorry, Menotomy, I love you, but you done me wrong this time.

Saturday 16 August 2008

The Runwell: Day 8 1/2

File this under "echoes of former glory." While I (still) wait for my cleaning solution for the rear wheel to arrive, I cleaned up the fenders, which had gone untouched since I took them off on Day 1. In terms of dents and dings, they actually look better than I thought, but the paint is in sorry shape. What's worse, actually, on both front and rear fenders, there are small protected areas where the paint retains its original shine and even remnants of the gold pin-striping that used to be there. I'd almost rather not see how it used to look, actually, it makes me sad.

I had been thinking about just leaving the fenders off when I reassembled the bike, but now I'm thinking that sanding them, priming them, and spray-painting them gloss black can't be any worse than keeping them in their present state. I can already hear the howls of dismay from the purists out there, but I refer you to my earlier post on painting. Someday I'll have the bike professionally repainted and re-chromed, but I've got to get it up and running again first, and why not have some nice-looking fenders until then, right?
  

Thursday 14 August 2008

Reader Project: Charlotte's (Mom's) Dawes

Charlotte runs the very wonderful Chic Cyclist blog, which we've mentioned here before, and has recently picked up a new old bike to refurbish for her mother to use on errands.  It's a 1954 Dawes, made in Birmingham, England that has been kept in a family friend's basement for some twenty-odd years. Charlotte rides a Dawes herself, and had lots of nice things to say about them. You can read more about Dawes' old-time bicycle philosophy here, but Charlotte is quick to point out that the new Dawes bikes, which you can find on eBay for $200, are now made by an American company and have nothing to do with the old English-made cycles.  Here's what Charlotte plans to do:

The current plan is somewhere between refurbishment and restoration. I want a clean and pretty bike my mother looks forward to riding. There are some decals which are gone. I haven't decided what I want to do about that. Perhaps I'll hand-paint them back on? That would probably be in the refurbishment category? I figure anything I do will stay true to the original Dawes vision of nice frame which one customizes with personal component choices....

You can see more photos here, and I'm sure Charlotte will continue to post about her progress, or at least give us a nice "after" photo with her mom aboard.

Wednesday 13 August 2008

The Hidden Cost of Daily Cycling?

As merely an inveterate tinkerer on rusty old clunkers, I wouldn't normally presume to weigh-in on such lofty topics, but in the last couple of weeks, I've seen that two of my bike-blogging comrades (Pete of The Bicycle Commuter Trials and Alan of EcoVelo) have fallen victim to tendonitis brought on by daily bicycle commuting. Pete blames his over-zealous and quite sudden conversion to bicycling, while Alan suspects that his saddle height adjustment might have played a role. My bicycle-commuting neighbor has also experienced similar problems with his knees. Whatever the cause, I'm curious to know others' experience with repetitive stress injuries, tendonitis, etc. brought on by daily riding. We all know (or, at least the males among us) about the threat of crushing certain, uh, "necessary" equipment, but what sorts of other injuries have people experienced? Lower back pain? Wrist or elbow issues? Foot/ankle issues?

If you're reading this blog, you're probably already convinced of the health benefits of daily cycling, or cycling for daily transportation, but perhaps we need to be having a more explicit discussion of the physical costs as well. I'd wager that most would agree that "active" injuries like tendonitis are somewhat easier to swallow than the long-term health effects of a sedentary lifestyle (obesity, diabetes, etc.), but I suspect there are folks out there who want or need to start using a bike instead of a car, who might well do serious injury to themselves, thus preventing them from getting back on a bicycle. It's certainly something to be aware of.  As our mothers used to say: an ounce of prevention equals a pound of cure.


Oh, and I found the image here.

Monday 11 August 2008

Reader Project: Pete's Schwinn Suburban

I'm happy to say that Pete found my blog while looking for a fender fix for his new old 1970s Schwinn Suburban. He found my post about DIY fender arm extensions useful, and shared some photos with me.  He's got many more at his blog, The Bicycle Commuter Trials, and a description of what he'll be doing with the bike. I've excerpted some of his description:

Recently my wife found a ladies bike being thrown away that was in fairly decent condition. All it needed was a good wash and a quick tune and it was on the road again. We also purchased a baby trailer so we could all go riding together...I wanted another bike made for cruising and having been inspired by cleaning up my wife's bike that she found. I wanted a true junker, something old & classic that needed some tender loving care.  A quick look on Craigslist and I found this 1970's Schwinn Suburban...[S]he needs some work & is in rough shape. The bike is non-rideable at the moment. On the way home I stopped by a Schwinn dealer and picked up a new front brake, all new cables, some missing nuts & bolts, and new tires & tubes. I also stopped by Autozone for some grease, steel wool, & some degreaser. I plan on breaking her all the way down, cleaning off the rust, & greasing her down. Then of course, building her back up with some fresh lube.

Happy grease-monkeying, Pete, and thanks for sharing!

Saturday 9 August 2008

Friday Evening

The Runwell: Day 8

While I wait for some super-spiffy cleaning solution to arrive by mail so I can properly clean the rear wheel, chainring, and crank arms, I decided to re-dismantle the rear hub and really clean the whole thing up. Here's all the little bits (more or less) looking much cleaner than they did previously.  To be perfectly honest, making all these dirty little parts all nice and clean again gives me a great amount of pleasure. It's probably 2/3 of the reason I like working on old bikes. As for the condition of everything in there, frankly, there's some wear, as one might expect from a seventy-odd-year-old hub, but only time (read: reassembly) will tell if everything still functions properly. I believe it should, but what do I know?
      

Friday 8 August 2008

Reader Project: Renee's Rollfast

Renee has started a blog to record the process of refurbishing her bike (sounds familiar...), which won't be a restoration, but a real custom job, including a paint job of her own design. Renee estimates it's a 1940s or 1950s model, but is having a hard time identifying it due to subsequent layers of spray and house paint. I think 1950s is probably on the mark, but I'm still developing an eye for these things, so don't take my word exclusive.  Here's what Renee has to say on her blog, Rollfast:   


Here's my funky old bike! As you can see, she's in need of some work. Luckily, it's all cosmetic. See that huge chain guard? That there is a canvas just crying out for art. I've got a neat design already worked out to paint on that. The first step will be to disassemble the whole thing (and label all the nuts and bolts so I can put it back together properly!). I'm probably going to have to order some of the parts online, but I'll check out some of the local bike shops for parts, too. The main thing it needs are new wheels and tires.


At the moment, Renee is in the middle of painting, so stop by and check it out.  Should be fun to keep an eye on!


Thursday 7 August 2008

I'm a Trend-Setter, I Guess


BICYCLE lovers, thrifty as well as trend conscious, are pulling neglected 10-speeds from storage and readying them for the road again. (Let the environmentally aware bragging rights begin.) These bicycles, made in the 1970s and 80s, used 27-inch wheels, which have been replaced with the smaller 700c wheels by road bike manufacturers. But a recent surge in sales of 27-inch tires suggests that the lowly steeds of yore are gaining new life as commuter bikes and weekend cruisers.

My 1970s Peugeot has 27-inch wheels. Whoopee, I'm cool. I don't look nearly as hip as these people, though.

Wednesday 6 August 2008

Perry Coaster Brake Hub

In response to my query a few days ago, a kind reader (rb, of A Balanced View) has helped me identify my rear hub as a Perry & Co. coaster hub (i.e. back-pedaling brake).  Apparently, the big arm (the brake actuator) coming off the left side of the hub and clamped to the frame should have been my first clue (you learn something new every day).  Here's a diagram of the hub, with all the bits identified.  I'm thrilled that I have a coaster brake--I haven't had one since I was a wee lad.

Tuesday 5 August 2008

Old Bikes Everywhere!

Over at Chic Cyclist, Charlotte has been posting some "bike makeovers" lately, which are quite lovely. Her usual photos of stylish cyclists around Boston also regularly feature old bikes. Neat!

Image from Chic Cyclist.

The Runwell: Day 7

I finally finished scrubbing the rust off the handlebars today, and found a chrome situation not to be envied. Well, it's not that bad, and it looks better in the picture, but there are definitely some spots where the chrome is gone, and the spots under the grips (not shown here) are quite badly rusted. I used fine steel wool and rubbing compound, followed by buffing with Brasso and a soft cloth. I think I've decided not to have everything re-chromed and re-painted just now. I really want to get the bicycle back together and try it out before investing that kind of money on it.

Next, I think I'm going to tackle the chain. A lot of people just chuck an old rusty chain without a second thought, but I've always had good luck cleaning them up and re-using them. I think this one is actually fairly new, too, and just looks like hell because it was stored outside. Well, I'll at least make a go at it, and see what it looks like under all that surface rust. EDIT: Never mind, I got to looking at it, and decided it's just not worth it to clean up the old chain, and that's saying something for a cheapskate like me.

Monday 4 August 2008

School Cycle

In New Delhi. Seen at Neatorama. I don't seem able to come up with a witty caption or comment about this photo, but I bet there is one.  I'll leave it in your capable hands.
 

Old Bike Blog International

Okay, so I'm usually a bit behind the curve when it comes to the Interwebs. I Flickr, but I don't Twitter; I blog, but I don't vlog, and I think all these words are just a bunch of nonsense anyway. However, one belated discovery I made over the weekend is actually pretty darn cool. I installed the free portion of StatCounter, as you can see by the little widget at the bottom of the right-hand column. I installed it on Friday, and watched my visitorship over the weekend, and was truly amazed by the amount of traffic. It's not heavy by internet standards, but I never knew I had so many visitors, even if they only stayed for 0-5 seconds. The most impressive part is the map of recent visitors, which I took a screen shot of this morning:

I'm really psyched that I have visitors in Indonesia, Korea, Australia, Brazil, etc. I even had one from Ghana, which seems to have disappeared from the map this morning. StatCounter does lots of other neat stuff, too, like keeping track of visitor paths, keyword searches, etc. I'm not sure what, if anything, I'll make from all this data, but it's very interesting. 

For the record, StatCounter did not solicit this post and I couldn't care less if you go to their site and install their thingy on your blog or site.  It's just neat, is all.  

Sunday 3 August 2008

Sunday in the Park

Saturday 2 August 2008

The Runwell: Day 6

Today's tasks (because I just couldn't fathom another day of rust-scrubbing) involved cleaning and repacking the front hub, which went quite well, and dismantling the rear hub just to see what was in there and how bad it was. I knew it would be pretty gummy and dirty because the 
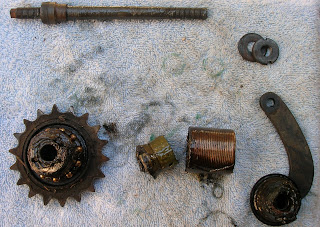
rear wheel barely turns. I had no idea. The photo on top shows the relative positions of the major pieces before I wiped the worst of the gunk off (yes, I know it needs gunk to work, but this stuff was--and still is--pretty badly gummed-up). The middle photo shows a more exploded view of the components, and the third photo shows them with the worst of the old grease wiped off.  

Also, having never taken apart a single-speed hub before, I was surprised at the complexity of the mechanisms. I mean, it's nothing compared to a three-speed hub, which frankly scares the ever-loving crap out of me, but I wouldn't have thought that just a single-speed would have so many moving parts. I can't find any exploded diagrams of single-speed hubs, and the outside of this one is still too rusty to find a manufacturer's stamp. Does anyone know if there's a general guide or diagram to one-speed hubs out there on the interwebs? I'd like to know what all the little bits are called.

Ping Blog

Step 1
Blog URL:


Blog Title (optional):


Blog RSS Feed (optional):


I agree with terms of service.

Step 2
Copy the following code and put it on your blog/site to help our blog ping tool track your submission (Need help?):
;

 
Design by Free WordPress Themes | Bloggerized by Lasantha - Premium Blogger Themes | Best Buy Coupons