Friday 31 August 2007

ALPINESTARS AL-MEGA E900

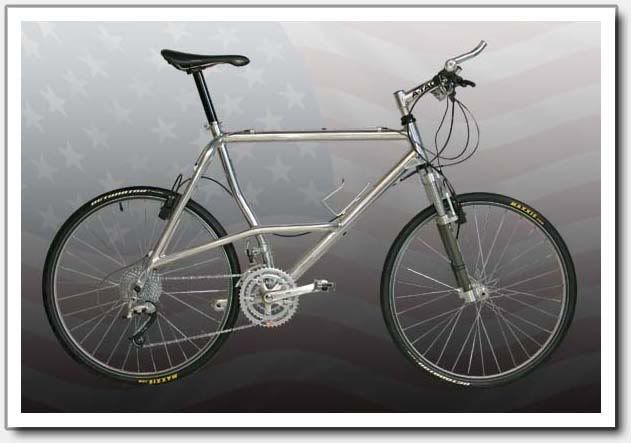
        LET IT SHINES. Sepeda ini adalah yang paling jangkung, dengan ukurannya yang 20,5 inch. Tidak semua bisa mengendarainya, karena sebentar saja sudah pegal-pegal terutama di otot lengan.
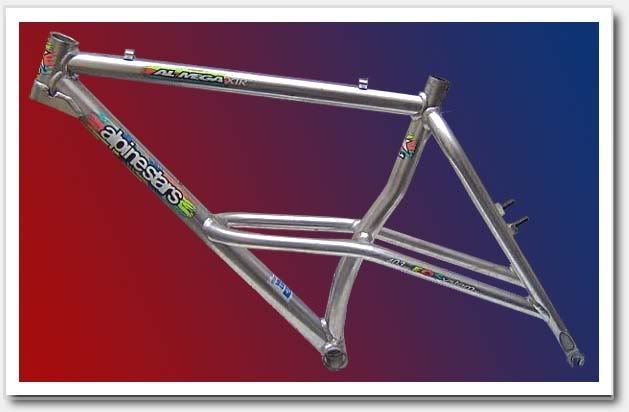
        Alpinestars saat ini tidak berproduksi sepeda lagi, dan type ini merupakan Racing Replica yang legendaris diajang lomba XC pada jamannya. Ciri mereka sangat spesifik dengan model frame bongsor seperti itu dan top tube yang relatif panjang, namun bobotnya cukup ringan.
Sepeda ini dirakit pertama tahun 1993, dengan sangat memperhatikan warna polish aluminium ekspos, bahkan sejak baru semua sticker dan decal tidak dipasang. Pemilihan parts juga sangat diperhatikan, agar memperkuat nuansa kilaunya. Semua parts masih dipertahankan, kecuali beberapa parts yang dibutuhkan saat merubah dari 21 speed ke 27 speed dan rise-bar.
        Perkembangan terakhir, sepeda ini kini dijadikan street-fighter alias hybrid, berhubung umur sepeda dan material frame dengan teknologi saat itu tidak memungkinkan lagi merambah medan off-road.

Alpinestar Al-Mega
Al-Mega Frame

Spesifikasi:
Frame : Alpinestars Al-Mega Race Replica, EOS(elevated oversize) Easton aluminium
Frame year : 1993
Frame type : elevated chain-stay hard-tail
Frame size : 20,5 inch
Color : exposed aluminium
S/N : I-0268 F-9203 3596

Forks : Answer Manitou Easton E9
Front derailleur : Shimano XTR FD-M901
Rear derailleur : Shimano Deore XT RD-M760
Shifters : Shimano Deore XT SL-M751
Crankset : Shimano Deore XT FC-M730-SG
Cassette : Shimano Deore LX CS-M580
Chain : Shimano XTR CN-7701
Bottom bracket : Shimano SG
Pedals : Suntour XC Pro
Brakes : Magura Hydro-stop-Mountain SH-1
Handlebar : Answer Easton Hyper-Lite w/ Answer bar-ends
Stem : Answer A-Tac
Grips : Specialized Sidewinder
Headset : Tioga Tange
Seatpost : orig.
Saddle : Selle-Italia Flite Titanium
Hubs : Ringlé (front), Shimano Deore XT HB-M760 (rear)
Rims : Mavic Ceramics M231
Tyres : Schwalbe Marathon Slick (1.75)
Cables : Jagwire ZHB-204
Accessories : Cateye Velo 8 (cyclocomputer), Cateye HL-EL300 (head light), Cuelight (tail light), Giant (bottle cage


Geometry

Gear Ratio

Alpinestars Logo

Priming Update

Update Update: This morning/afternoon, I put the two extra coats of primer on the fenders, chain guard, and fork and also primed the frame. I went ahead and put 5 coats of primer on the frame, well-spaced at about 15 minutes between coats. I didn't get a real smooth coverage on the whole frame, not sure what the problem was. I'm hoping that buffing with the steel wool will smooth it out. I'm going to let everything dry again for at least 24 hours before I start with the paint.

I forgot to take a picture of the primed frame, but imagine this: it's all gray.


So, last night I used some "0000" steel wool to smooth out the primer before doing the first paint coat, and even a very light touch completely removed the primer in a few places on the fenders. I'm going to do another two coats of primer on everything; that's five coats altogether, if you're keeping track.

I'll post another update once I've done that.

Wednesday 29 August 2007

Priming: The Fork


I had planned to paint the fenders and chain guard today, but I decided to let them sit a while yet with the primer on them, just to make sure they're good and dry. I'm sure it's overkill to let them sit this long, but you never can be too careful. I did prime the fork today (Photo #1), which went fine. I also masked off the headbadge and bearing cups on the frame (Photos #2 and #3). Photo #4 is the "bicycle butcher shop" (a.k.a. the laundry room where I've hung everything up).

It's probably going to be the weekend before I can get back to the bike, so everything should be nice and dry. By Sunday night, I hope, everything will be painted.

Tuesday 28 August 2007

Priming: Fenders & Chain Guard


Today I finished sanding the chain guard and primed it and the fenders. I strung a rope in the car-hole (garage is too elaborate for what we have) and hung the fenders by their braces, which I taped-off with masking tape (Photo #1). To hang the chain guard, I used a "modified" wire hanger (Photo #2). I primed both sides of everything (topside and underside) to protect against rust and wear. I'll paint and clearcoat both sides, too.

I put three light coats of primer on all three pieces, which seemed to give me good, smooth coverage. Supposedly, you can start applying paint within 15 minutes, but I'm going to wait at least 24 hours just so the primer has a chance to get really dry and hard. I'm also storing the parts in a very warm laundry room--still hanging up--to maximize drying.

By the way, I'm using Ace Rust Stop products for this paint job--so far, so good.

Oh, and if you're working in an enclosed space with poor ventilation, always wear a mask. Fortunately, our car-hole is so small that ventilation (if not a cross breeze) wasn't too much of a problem with the door open, but I was still glad for my mask, and took frequent breaks to step outside. Still might have done some brain damage-amage-amage.

Monday 27 August 2007

Sanding the Old Paint, Part II


Well, I've got the entire frame and fork sanded now. The fenders I just roughed-up with a sanding sponge, since they have so many dips and contours, and I'm still working on the chain guard. If your fenders are just smooth, it might be easier to sand the paint all the way off, but with mine that would be a study in frustration.

So, here's what I did:

On the frame and fork, I found that 100 grit (medium) sandpaper worked best. It took the paint and undercoat off quickly and didn't scratch the metal. One problem with just using a folded sheet of sandpaper is that I couldn't get all of the little nooks and crannies completely sanded down. After the sandpaper, I took a sanding sponge and sanded off all the remaining spots of old primer and worked the edge of it into as many corners as possible. Picture #1 shows how successful (or not) I was around the area where the seatpost slides in. Picture #2 gives you some idea of how the frame looks all stripped down. In the places where I wasn't able to get the paint all the way off, I did manage to rough it up a bit so it will take the primer. Picture #3 shows the tools used for the sanding (not pictured are my hands sans fingerprints).

Next step is masking off the bearing cups and head badge (I never was able to get them off), and then it's on to primer!

PS--Sorry for the crappy picture quality; could not take a clear picture to save my life today.

Wednesday 22 August 2007

Sanding the Old Paint

One of the bad things about recording one's thoughts in print: it hurts worse when they come back to bite you in the backside.

On August 19, I wrote: "I think the sanding will go pretty fast."

I was wrong. Well, I guess it is going relatively quick, but it's a bit harder than I thought it would be. The fault is partially my own, as I started out using sandpaper that was too fine (220 grit). I have now switched to a 120 grit sandpaper, which is taking the paint off much faster. Of course, there are lots of angles and nooks and crannies where the sandpaper won't reach (at least not very well). I may also be sanding my fingerprints off in the process. Maybe some gloves...

I was going to try to have the sanding done by this weekend, but I don't think that's going to happen, since I just ran out of sandpaper and have to go buy some more.

I'll post pictures when all the sanding is done.

Tuesday 21 August 2007

New Look for the OBB

I got tired of the old look, so I changed the template. I'll probably change it again in a few weeks. I'm shifty like that. No new work on the bike, gonna devote this weekend to sanding, masking, and priming, but until then, I have to do actual work.

Sigh...

Sunday 19 August 2007

Last of the Cleaning

Today, I finished cleaning everything, including wiping down and de-greasing the frame in preparation for sanding. I cleaned up the external hardware on the rear hub and started to try to get at the bearings, but quickly got in a little bit over my head. I had hoped that the bearings would come out without the whole hub assembly coming out, but when I started to take off the bearing race, the whole hub started to come apart, so I veeerrry carefully pushed it all back together and tightened everything back down. The thing about the rear hub is that it's pretty complicated and seems to be working fine, so why fix it if it ain't broke? The brief glimpse I caught of the bearings, however, they seemed to still be pretty well greased, so I'm not going to worry about it. It all still seems to work after my little misadventure, but I won't know for sure until I put the whole bike back together.

If you really want to know how to take apart a Sturmey-Archer 3-speed hub, check out Sheldon Brown's guide on the subject. Maybe someday I'll give it a try.

All in all, I'm really glad to have everything cleaned now. I think the sanding will go pretty fast, so I need to go finally buy the primer, paint, and clearcoat. I also need to place my order for the new shifter and cable and such with Harris Cyclery. Exciting. I hope I can have everything put back together by early September.

No interesting pictures today, sorry.

Tuesday 14 August 2007

Stencils


I've been stewing over how to reproduce the "Columbia Sports III" logo on the chain guard, and also to reproduce, with paint, some decals that had completely peeled away from the fork, leaving only the outlines of their shapes. After much experimenting, I finally cut what I think are some passable stencils. The process was harder, I think, than it had to be.

First, I tried frisket paper to create a stencil, but the film was too thin and stretchy for the detailed work. I ended up taking close-up shots of the words and then cropping and printing them on regular printer paper. I cut the letters out to create a stencil, then used it to create another stencil with the backing of the frisket film (not the actual film itself)--the benefit of using the frisket backing for the stencil is that it is coated in plastic and won't (I hope) allow the paint to soak in and bleed through. To make the stencil stick to the metal while I paint it, I put two-sided tape with a removable backing on the backside. To fill in the center of the "O", "B", "A", "P", "R" and "III", I'll use a very small brush dipped in the main color of the bike, which will be red, after I use the stencil to paint the words on.

There are probably easier ways to do this, and it may not work, but we'll just have to see. If anyone reads this, and knows a better way (short of paying someone else to do it), I'd be glad to hear it. This is what I've been doing for the past couple of days, so I haven't gotten to cleaning the rear hub yet. Soon.

Friday 10 August 2007

Removing the Stem and Fork

Well, the bike is all apart now, with the exception of the stubborn bearing cups on the crank and headset, which I guess I'm just going to have to tape off when I paint, 'cause they're not going anywhere. The last things to come off were the stem and fork, which I did yesterday. I should take this opportunity to mention that I'm going largely from the book How to Restore Your Collector Bicycle by William Love (Bicycle Books, 2001). It's not perfect, by any means, but it's proving to be a good general guide.

I have to admit that as a new-comer to this, I was most confused by the headset assembly; and after taking it apart, I still don't quite get how it works. As a result, I meticulously documented every step with the digital camera just to make sure I could put it all back together in the right order. These are some of the more useful photos.

Photo 1 shows the stem after I removed it, with the expansion wedge at the bottom. To take off the stem, back out the bolt at the top of the stem about 1/2" and give it a good whack with a wooden or rubber mallet, or a regular hammer and piece of wood. This will dislodge the expansion wedge--it's very obvious when you are successful, as the stem will just slide out.

Photo 2 is probably a "well, duh" image for more experienced bike folks, but I wanted to remember the correct order for the hardware at the top of the headset once the fork was removed.

Photo 3 is looking down at the bearings at the top of the headset after removing the stem and hardware (and my feet make an appearance, as well).

Photo 4 shows the bottom bearings resting on the bottom bearing race.

Photo 5 shows the chrome plate on top of the fork removed. There is a tiny lip on the front side of the chrome plate that holds the plate to the fork. You can see where it attaches by where the metal on the fork is worn. I took this for my reference so I would remember later how to fit the plate black on.

Most of the hardware I've taken off now has been cleaned and bagged for reassembly. I took the front hub apart today, but didn't take any pictures, since it actually is pretty self-explanatory once you start it. Next, I'll take as much of the rear hub apart as I can, although I will not be venturing into the more intricate mechanics of the internal hub. I'll just be cleaning the dirt and grease off the external components and cleaning the bearings. I will take some photos of this and post them soon. Then, cleaning the frame in preparation for sanding.

Wednesday 8 August 2007

Cleaning Small Parts is Fun


So, I tackled the crank hardware last night and this morning using "Pedro's Bio Cleaner" (my usual all-purpose bike cleaner), a toothbrush, my thumbnail, and some very fine ("0000") steel wool. I used the toothbrush and my thumbnail to get the old dried-on grease off, and the steel wool to polish off the accumulated grime on the crank and crank arms, and to give them a bit of a shine. Compare the second photo with the similar "before" picture from yesterday.

My next goal is to take off the headset/fork. Should get to that in a day or two. At that point, everything will be off the frame and I'll be ready for cleaning, sanding, masking, priming, painting, detailing, and clear coating, all in that order. All done by me.

Tuesday 7 August 2007

The Crank


I finally went to the hardware store and bought a big enough wrench to take off the crank. For future reference, I needed the 10" adjustable wrench for the 1 1/8" inch nut.

The photo on top is the "before" picture of the crank assembly. In this photo, the bike is upside down and we're looking at the left side crank.

The second photo shows the "exploded" assembly after I took it apart, with the bearings exposed. The bearings come out, too, but were left in for the picture. One note here: everything I've read on removing the crank says that a spanner wrench is needed to remove the bearing race (a.k.a., adjusting cone), but mine came off just by turning with my fingers. Is this bad? I don't know.

In the third and fourth photos, I've circled the groove in the threads and the little tooth on the crank plate and washer than fits into it. These should be lined up for reassembly.

The fifth photo shows how dirty and grimy the inside of the crank assembly was. Shown here are the bearings for the right side. The old bearing grease has dried up and gotten gummy and dirty, which was probably dramatically affecting the ride of the bicycle. The last photo shows what fell out of the inside of the crank assembly--one very greasy, very dead insect.

Once I clean things up, I'll post some new pictures, just for contrast. I also have some thoughts on painting to post soon.

Sunday 5 August 2007

Think dirty. In a good way.


Actually, Keith Pops talks about a good deal more than old bikes at his blog, but his site DirtyAgency.com has a major focus on his work restoring old bikes. He's got some cool photos, a few links, and a sexy promo video, and he promises more soon.

Thursday 2 August 2007

The Wheelmen.org

If you've happened upon my little half-acre of webspace and perhaps been disappointed that my 1971 Columbia Sports III isn't exactly all that old, here's a link that should fulfill your old bike fix.

From their website TheWheelmen.org:

The Wheelmen is a national, non-profit organization dedicated to keeping alive the heritage of American cycling, promoting the restoration and riding of early cycles (1918 or earlier), and encouraging cycling as part of modern living. Members are intent on learning lost skills, retelling lost stories, researching and writing of the golden era of cycling.

As for my own best efforts, they're on hold this week until I can get to the hardware store for a bigger wrench. Then, look out!

Ping Blog

Step 1
Blog URL:


Blog Title (optional):


Blog RSS Feed (optional):


I agree with terms of service.

Step 2
Copy the following code and put it on your blog/site to help our blog ping tool track your submission (Need help?):
;

 
Design by Free WordPress Themes | Bloggerized by Lasantha - Premium Blogger Themes | Best Buy Coupons