Thursday, 29 November 2007

Gettin' the Word Out

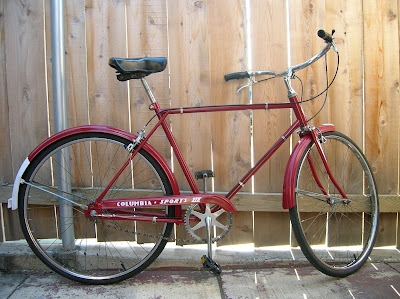
Big thanks to Hank over at the Flickr photo group Three Speed Bicycle Lovers for posting a nice comment to the group about my blog (with photos and everything!). I hope reading over my miseries and joys proves instructive and/or entertaining for any folks who followed the link over here. And I hope my new 10-speed project doesn't disappoint--the Columbia is still my main ride. If anyone has questions or comments, please feel free to post them, and I'll either write you back personally, or post answers to the blog if they'll be useful to the group. It was fun and (relatively) easy to refurbish my bike, and while I'm sure I inadvertently did all kinds of things wrong, it all seems to have worked out in the end.

Wednesday, 28 November 2007

More Photos of the Peugeot


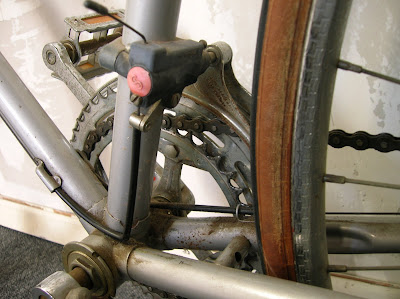
I took my customary before photos today, as much to show what needs work as to document where everything goes when I put it back together. Some of the photos here show the dirt, rust, and wear on the bike, others just turned out looking neat, so I put them up. I'll probably get started dismantling and cleaning this weekend.

Monday, 26 November 2007

A New Old Bike

Hmmm, well, I bought another bike (yeah, I know, this is how it starts). Actually, my father bought me an early Christmas present from 1,000 miles away. See, I was at a thrift store with my wife on Saturday (our version of Black Friday shopping), and I saw the bike sittin' there for $99, and it was on sale. I'd been wanting a road bike to use for exercise, since my Columbia is more for getting around town and less for longer-distance rides. I didn't buy it then, I just figured it was an unnecessary expense. But, I kept thinking about it, talked to my dad, and today went back and bought the darn thing for $69.99. My dad said it was the easiest Christmas shopping he'd ever done.

Here's the deal: from what I've been able to gather from the pundits on the web, it's a Peugeot UO-8, probably from the 1970s, although there seems to be some discrepancy with the serial number, which indicates it's from the 1980s. I guess Peugeot serial numbers can be a bit funky, and not always reliable to date the bike. This model was apparently imported into the U.S. in mass quantities during the 10-speed craze of the 1970s. It's not especially special, but it will get the job done. It's a steel frame, which I like, but it's still relatively light compared to my Columbia. I think it's a very nice-looking bike, although these pictures don't do it justice. I'll try to get some more up soon, but I ran out of batteries for the camera.

It needs to be cleaned up, the derailer needs to be adjusted, and the bearings might need grease. The cables look to be in good shape, but the brakes could be tightened up a bit and the shoes replaced. At some point the saddle and handlebar tape could also be upgraded, and the tires aren't in great shape, but they're fine for now. I'm NOT doing any painting on this one, but I'll chronicle my cleanup and have some "after" pictures.

Okay, Internet, I swear I'll only buy one more bike (for my wife), then I'll stop. Probably. Not. Oh, man...

Thursday, 22 November 2007

I know a place where no cars go.

I took a ride today down into Balboa Park, down to the Prado area--the pedestrian-oriented complex of museums near the San Diego Zoo. Since it is Thanksgiving today, I figured the roads would be pretty bare, and for the most part I was right. The picture above is at the intersection of Park Boulevard and Village Place. Park Blvd. is normally a very busy north-south thoroughfare through the park, but not today. There was some traffic, but not much. Once I got to the park, I was surprised to see quite a number of pedestrians strolling about, despite the fact that the museums were all closed for the holiday.

I saw joggers, bikers, pedestrians, people walking dogs, kids with scooters, you name it. Although I was kind of hoping for a post-apocalyptic level of quiet, I was also really pleased to see so many people eschewing the turkey coma and football stereotype that has become so common for this holiday.

It would have been a near-perfect ride, but for the fact that there is no good way to get from one side of Balboa Park to the other, unless you're driving a car. The canyon that runs through the center of the park is steep, and there are no sidewalks on Morley Field Drive, the main connector between the two sides. I made it about half-way up the hill on my bike before three speeds proved too few, and I had to bail out and haul my bike over the curb and onto the steep, rocky path that has been worn onto the shoulder (see photo above).

In terms of bike performance, I'm still getting used to shifting and getting the cable tension right. I had a couple moments of heart-thumping when the peddles freewheeled forward in second gear while I was in the middle of the street (one reason I wanted to go for a ride on the holiday). I think I've got everything adjusted now. Also, I charted my course on my Google map, which you can click at right.

Happy Thanksgiving, everyone!

Monday, 19 November 2007

On Doing It Yourself

I have rarely been so happy as when I looked at my finished bike for the first time and thought, "I did this." It was a big project for someone who had never done anything like this before, and who considers himself mechanically disinclined. But, I'll be danged, I did it. The whole project came out exactly as I imagined. I now have a bike that works better (like new, in fact) and looks better, and I did every step of the process myself. I learned how to cut and install new cables, adjust a Sturmey-Archer 3-speed shifter, make fine adjustments on caliper brakes, sand, prime, and paint a bike, grease and reassemble the crank, headset, and axle bearings. I took my time (boy, did I), and I made sure that I did every step of the process just the right way. I documented everything with photos and meticulously bagged and organized each part I took off. In short, although it took me four months to do it, I did exactly what I set out to do.

I don't share all this just to feel good about myself (but, heck, I do!), I share it to make a point. Whether it's fixing bikes or cars (preferable bikes), home improvements, gardening, cooking, art projects, crafts, whatever, if you do it yourself you gain something in the doing. Not just the result you were shooting for, but a sense of accomplishment, a sense of pride in workmanship, and a new set of skills and experiences. If you take a chance, try something you thought impossible, you might actually accomplish it, and although it sounds a little trite, there is no better feeling in the world. In the process, you gain a little confidence, a little independence, and ultimately, I think, a better sense of yourself.

Sunday, 18 November 2007

After Pictures (first of many)


Friday, 16 November 2007

IT LIVES! Mwaaa-ha-ha!

Two big revelations today: 1) I actually have a bike with three speeds now, instead of a three-speed bike that doesn't work right; and 2) I am dramatically out of shape.

Both of these came to me today while taking my bike for its first test ride. Let's focus on the first one. After much adjusting and fidgeting and swearing, I finally got the shifter cable adjusted properly (see Sheldon Brown's how-to section on 3-speed cable adjustment--it's about half-way down on the linked page.) The real bugger was getting it adjusted so that it wouldn't freewheel in the middle gear. I now thoroughly understand how to make such adjustments in the future. Thoroughly.

For the first year that I had the bike, I never noticed much difference in the three gears, and now I know that I probably wasn't even moving through the gears when I moved the trigger. Having all new parts (cable, trigger shifter, and indicator spindle) makes a huge difference, and knowing how they should be properly adjusted is essential. It's really a joy to ride now, especially with everything greased and oiled. I was hoping to notice a dramatic difference in the way it rode, but I had no idea it would be this dramatic! I wish I had done this as soon as I got it.

I've got a few more little adjustments to make on the brakes and a loose nut to tighten on the rear fender, then I'll polish it up with another coat of Turtle Wax and take some "after" pictures. I've also assembled an album of "before" pictures that didn't get posted. An "after" album will go up soon as well.

PS--check out my Google map to the right for the route of my test ride today.

Thursday, 15 November 2007

Putting on the Brakes

My task yesterday was to put the brakes back on, a somewhat daunting task because it involved my first-ever cable cutting. I was afraid I would somehow cut in the wrong place and have cables that were too short or some similar disaster, but that part went pretty well. I just used my old cables and housings as a guideline. The only problem came when I actually assembled the hand brakes and noticed that the metal caps the bike shop gave me for the ends of the new cables were too small for my hand brakes. I was able to reuse the plastic cap on one side, but on the other side, it had cracked. Using the new caps creates a problem because when I squeeze the brake, it moves the whole housing instead of just the cable on the inside, which is what actually works the brakes. I rigged a temporary solution with a washer and a piece of rubber I cut from an old tire, but I'm going to need a more permanent solution.

This is what it is supposed to look like. You can see that the plastic cap is designed to keep the housing from moving around when the cable is pulled with the handbrake.

And here's what I rigged up. First tried just the piece of rubber with a hole punched through it to let the cable work, but the rubber just got pulled through the opening in the handbrake when I squeezed the brake. I then added the washer to provide some resistance. The tightness of the cable keeps the whole thing in place and it seems to work well enough for now. Maybe I'll try to fix the other old plastic cap somehow. I guess a more permanent solution would be to just get new brakes altogether, but I am really interested in using as much of the original bike as I can.

PS--the black cable housings look really sharp against the dark red paint.

Tuesday, 13 November 2007

Arr, she's a fine lookin' craft, but will she sail?

That, more or less, is the question. I put the fenders and wheels on today and it was nice to see my bike looking like a bike again, instead of just a collection of parts. I have to admit, I was a little surprised at how good it looks. Damn good, if I may. If it rides half as good as it looks, I'll be happy.

I was a little afraid that when I put it back together, it would come out as something else entirely, like when the Simpsons tried to build a pool and built a barn instead. Then, the Amish guy says, "'Tis a fine barn, but sure 'tis no pool, English." Yeah, that's what I thought would happen.

Next, I'll put on the chain, the brake and shifter cables, the brake shoes, and chain guard. Then, make some adjustments and tighten everything down and I'll be done. I'm a little nervous about cutting and installing the cables, since it's pretty important and I've never done it before. 'Course, I guess I've never done any of this before...

Sorry about the poor lighting--I'm saving the really nice pics for when the whole thing is done.

Monday, 12 November 2007

Surprise! Reassembly!

I had planned on doing the second clear coat today, and even started on it, but the first piece I coated (the front fender) got all bubbly and cracked and spotty-looking. I think I must have put on a too-heavy coat, but I decided not to push my luck with the other parts. So, instead of doing two coats of clear coat on everything, I'm calling it good with just one. Tomorrow, I'll buff off the botched clear coat on the front fender and then try to reapply it more smoothly. I put a coat of Turtle Wax on everything else, which will also act a protecting layer. Then, I took off the masking tape from the bearing cups and head badge and started putting the whole thing back together. As you can see below, I got the fork and handlebars, the seat, and the crank put back on the frame.

Nothing too technical here. I just put the seat back on so I could flip the bike over later to work on the crank, fenders, chain, etc.

Here's how I put the fork and stem on: 1) pack the bottom bearings of the fork and set on the bottom bearing race; 2) insert the fork into the tube and let the frame rest on the fork; 3) grease the bolt and expansion wedge on the stem and pack the top headset bearings; 4) insert the stem into the tube and tighten the stem bolt.

Tips on the process: 1) don't tighten the bearing races too much, just enough to hold the bearings in the cups. If you tighten the races too hard, they won't turn freely; 2) same goes for the stem bolt; it should be tight, but not so tight that it affects the steering of the bike; 3) try to line up the fork and handlebars with each other and with the frame; you can fine-tune once the bike is ridable, but the straighter everything is now, the easier it will be to make fine adjustments later.

And then, the crank. Pretty straight-forward: pack the bearings and grease the cups, lightly tighten the bearing race on the left (non-chain) side, and put the hardware back on. Again, when you tighten the nut on the outside of the left side, don't make it too tight, as this will push the bearing race into the bearings and affect the turning of the crank. Remember, the nuts and the bearing race on the crank turn counter-clockwise so they won't spin off while you're riding, so they don't have to be made too tight.

So, there you go--clear as mud, right?

Tuesday, 6 November 2007

A Long, Strange Trip

Well, it wasn't that strange, but it sure was long. Three weeks is a long time to be gone when you're a homebody like me. I spent a good amount of time doing research in central Illinois, then another week in my old stomping grounds in Chicago, where I snapped the pictures below. There were so many old bikes around Hyde Park, I couldn't hope to snap them all, but I got a few. It was great to see so many of them being used. Of course, most of them, the chain was squealing, the fenders were rattlin', and the tires needed air, but they were being ridden, at least. Of course, they were usually being ridden on the sidewalk and through stop signs, but whatever. Soon enough, I'll get back to the clearcoat and then reassembly on my own little machine. Hoo-ray!

{that says SEARS, by the way}

Ping Blog

Step 1
Blog URL:


Blog Title (optional):


Blog RSS Feed (optional):


I agree with terms of service.

Step 2
Copy the following code and put it on your blog/site to help our blog ping tool track your submission (Need help?):
;

 
Design by Free WordPress Themes | Bloggerized by Lasantha - Premium Blogger Themes | Best Buy Coupons