Showing posts with label hubs. Show all posts

Thursday, 15 October 2009

Salvaging a Hub, Part II

The final cleanup on the salvaged Sturmey-Archer TCW III was accomplished by scraping the remaining rust off with a razor blade, then several rounds of polishing with rubbing compound and Brasso. Some areas of the chrome have been cosmetically damaged by the rust, but not the scraping. There has been no structural damage to any of the exterior pieces of this hub. In fact, all cleaned up, many of the bits are in better shape than those on the Huffeigh. I don't post this to gloat (okay, maybe a little), but to demonstrate that even a hub that looks as bad as this one did may be worth a try to salvage and make useable again. Don't give up on bike or on salvage parts just because they look a little rough!

Sunday, 11 October 2009

Salvaging a Hub

I know I have lots of updates to give on various projects, which I will hopefully get to this week, but in the meantime, here are some photos of my latest project, which is really just a side project for the Phillips roadster.

My friend Mauricio tipped me off to a cheap junker bike at a local estate sale. I picked up what's left of this 1964 Huffy Sportsman for $10, and I'll probably be able to salvage a few things, but the main thing was the rear hub. It's a Sturmey-Archer TCW III, a three-speed coaster brake hub. Sheldon Brown says the TCW series is unreliable as a coaster hub, citing possible failure of the brake if the cable is not properly adjusted, but for the money, I'm willing to give it a try.

My wife has hinted that perhaps she would like to ride the Phillips when it's finished and she really liked the idea of a coaster brake. I, however, wanted to put a three-speed hub on it, so here's the compromise, which suits all parties. True, it's not period-correct for the Phillips, but the correct K Series Sturmey-Archer hubs seem to be hard to come by and somewhat expensive, and not available in a coaster brake model. We'll have the rod brakes, too, just in case there's a problem with the coaster brake.

Here's a little photo series on my efforts to salvage the hub:

The before photos:

I had to cut the spokes with a pair of aviation snips because the nipples were too corroded to turn and the spokes too rotten to reuse.

Below, the top layer of gunk and rust has been scraped off:

Below, rust removal continues with fine steel wool, penetrating oil, rubbing compound, and even very carefully applied sandpaper over the worst rust spots, never used directly on the chrome.

The external cleanup on this hub is probably about half-finished. I'm hoping for near-pristine by the time I'm done, but it's going to take a lot more elbow grease to get there. I took a peek at the internals, and everything is surprisingly clean in there, so maybe I can get away with not dismantling it entirely.

Monday, 23 February 2009

Sturmey-Archer Hub

Here's a nice photo I snapped of the Huffeigh's Sturmey-Archer AW hub before I reassemble the wheel. Just gratuitous old bike pron.

Thursday, 5 February 2009

Huffy/Raleigh Chrome Update

I promised an update on how my super cheap-o chrome touch-up went. I didn't get everything done last weekend that I wanted to, but overall I would say that the silver paint solution is only partially successful. Here's a rust spot on the front hub before and after touch up with the silver paint sprayed on a paper towel.

Obviously, it doesn't completely match the chrome, but for just a couple dollars a can, what can you expect? After all, the idea is to make the rusty spots look better, not perfect.

The main problem, however, is that even when dry, the silver paint (and all readily available metallic spray paints, based on the customer reviews I've found online) rubs off very easily. After more than two days of drying in very low humidity, I still had a bit of silver on my fingers after handling painted items. My solution to this (hopefully) is going to be to clear coat all of the silver painted parts with spray enamel, essentially encasing the silver paint. I've experimented with this on the small nose cap on the front fender, and it seems to work. The real test will be whether it works on the brake lever, since I'm not keen on showing up silver-handed everywhere I go.

I'll add that I would not recommend this technique for folks intent on doing meticulous original restorations, or who are super-finicky about having everything look just so. This technique covers the rust, but if anyone looks closely enough, it's very obvious that it's just silver paint. Also, only time will tell how durable this solution is. That being said, I think it's going to be just fine for the Huffeigh, since it's going to be a working cargo bike, not a museum piece. 

Monday, 5 January 2009

Huffy/Raleigh Cleanup

I've lost track of the number of days I've worked on this bike so far, so no more "Day 5", "Day 16", "Day 146" updates.

I've mostly been hard at work on the cleaning. I'm still waiting on a special-order lockring spanner wrench to get the bottom bracket apart, and in the meantime, I've taken down the front wheel and cleaned and repacked the hub. I didn't take photos of the process because cameras and bearing grease aren't a good combination in my less-than-capable hands, and I still haven't been able to hire that assistant (or housekeeper, for that matter). But here's an after photo of the front rim and hub, shown beside the rear wheel for a before/after comparison.

My project over the weekend was to completely clean and repack the pedals, which are in good enough condition to reuse. They were in such rough shape that it took me an entire afternoon, but I'm pretty happy with the result. The photo below shows the clean bits of the outer bearing assembly of the right pedal. More photos at my Flickr photostream.

Basically, all the other parts (except the rear wheel--I'll have something to say on that later) have now been cleaned once, just to see what I'm dealing with in the way of chrome and paint disintegration, and I'll be cleaning everything very thoroughly and meticulously again before reassembly.

The story isn't great for the chrome, which I'll post on later, but the paint isn't too bad. I won't have to repaint everything; the fork, for instance, is in brilliant condition, and most of the down tube is almost pristine. There are some trouble spots, however, where rust has done away with the paint almost entirely. For repainting, I've settled on the front and rear fenders, the chain guard, the top tube and head tube, and the seat stays and chain stays. All of the decals on the chain guard and frame will be preserved, however. Hey baby, I'm rollin' on a Huffy and I want people to know it! (that was some subtle sarcasm--for those who don't know, Huffy developed a rather poor reputation in the half-century since this bike was made).

Anyway, I promise more regular updates in the new year as I work on this project. I'm hoping to put everything back together and assemble all of my replacement parts by spring, but I'll also be finishing and defending my PhD dissertation between now and March, so I may drop off the edge of the blogosphere for a little while in late February. Just so you know.

Friday, 22 August 2008

The Runwell: Days 11 & 12

After one day spent badly bungling trying to re-lace my rear wheel, an evening carefully studying Sheldon Brown's guide, and another afternoon finally getting the stupid thing right, I can now say that I've built a wheel, or rather rebuilt a wheel. Once I actually pulled my head out of my...well...and thought about it for a minute, it all went pretty well, with the exception that I stripped a nipple (cue childish snickering) that's going to have to be replaced and the wheel trued.

I also greased and reassembled the rear hub, and now have a functional rear wheel that's in much better shape than when I found it. Here's the before picture for a comparison.
 
I've even tested the coaster brake by spinning the wheel in my hands, and it seems to work just fine. Like I said before, it's not quite as shiny as I would have liked, but there's only so much one can do after years of weather. 

On a side note, after exchanging emails with a very nice gent and former mechanic in England (who remembered when Runwell was still around in the 1960s as a smallish parts distributor), I believe I'm dealing with what's left of the original nickel plating, rather than chrome, which does a little more to explain why it was so badly deteriorated. Chrome was apparently introduced in 1928, but nickel plating was still applied after that date, so it remains hard to pin down exactly when my bike was manufactured.

Wednesday, 20 August 2008

The Runwell: Days 9 & 10

Despite my recent disappointment at the utter failure of Menotomy's "Vintage Bicycle Cleaning Kit" (grrrr), I've been plowing ahead with the rear wheel cleanup. Unfortunately, although it is certainly better than it was, I have had to settle for an "antique patina" finish rather than shiny chrome and steel. The chrome is simply wasted after years of rusting outside. As a testament to the heartiness of the old construction, everything is still structurally sound, just cosmetically ruined. I'm still pressing on with my plan to get the bike back up and running before thinking about repainting and re-chroming (after all, I've not even ridden the thing yet), but someday down the road, I'll do both. Until then, no riding in the rain (not hard in SoCal). Here's the after picture of the outside of the rear hub, with the Perry mark relatively clear. The shiny strip is the result of being covered by the dust clip for so many years. Below is the before picture, so you can see that I did accomplish something. Right now, I still have the wheel completely taken apart, and everything is clean (if not shiny). I've never taken apart or reassembled a wheel before, so I'm advancing with trepidation, but I have faith that I'll be able to figure it out. I only attempted it here because the single-speed wheel on the Westwood rim is built without a dish because there is no derailer and gear cluster to compensate for, making it a much more straightforward build. For those who are interested, the rear rim is a 40-spoke design, typical of old English bikes, but not otherwise very common.  I'm going to hold off posting a "how to" about reassembling the wheel until I see if I actually "can do," but check out Sheldon Brown on wheel building in the meantime. Once the wheel is back together, both wheels and the frame are off to the bike shop for truing and to have the cottered cranks and stubborn stuck pedal removed. Once that's done, I'll just need to assemble all the replacement parts, and put 'er back together. I'm sure it won't be that easy, however.
 

Saturday, 9 August 2008

The Runwell: Day 8

While I wait for some super-spiffy cleaning solution to arrive by mail so I can properly clean the rear wheel, chainring, and crank arms, I decided to re-dismantle the rear hub and really clean the whole thing up. Here's all the little bits (more or less) looking much cleaner than they did previously.  To be perfectly honest, making all these dirty little parts all nice and clean again gives me a great amount of pleasure. It's probably 2/3 of the reason I like working on old bikes. As for the condition of everything in there, frankly, there's some wear, as one might expect from a seventy-odd-year-old hub, but only time (read: reassembly) will tell if everything still functions properly. I believe it should, but what do I know?
      

Wednesday, 6 August 2008

Perry Coaster Brake Hub

In response to my query a few days ago, a kind reader (rb, of A Balanced View) has helped me identify my rear hub as a Perry & Co. coaster hub (i.e. back-pedaling brake).  Apparently, the big arm (the brake actuator) coming off the left side of the hub and clamped to the frame should have been my first clue (you learn something new every day).  Here's a diagram of the hub, with all the bits identified.  I'm thrilled that I have a coaster brake--I haven't had one since I was a wee lad.

Saturday, 2 August 2008

The Runwell: Day 6

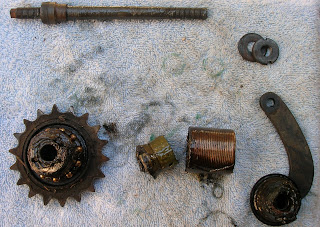
Today's tasks (because I just couldn't fathom another day of rust-scrubbing) involved cleaning and repacking the front hub, which went quite well, and dismantling the rear hub just to see what was in there and how bad it was. I knew it would be pretty gummy and dirty because the rear wheel barely turns. I had no idea. The photo on top shows the relative positions of the major pieces before I wiped the worst of the gunk off (yes, I know it needs gunk to work, but this stuff was--and still is--pretty badly gummed-up). The middle photo shows a more exploded view of the components, and the third photo shows them with the worst of the old grease wiped off.  

Also, having never taken apart a single-speed hub before, I was surprised at the complexity of the mechanisms. I mean, it's nothing compared to a three-speed hub, which frankly scares the ever-loving crap out of me, but I wouldn't have thought that just a single-speed would have so many moving parts. I can't find any exploded diagrams of single-speed hubs, and the outside of this one is still too rusty to find a manufacturer's stamp. Does anyone know if there's a general guide or diagram to one-speed hubs out there on the interwebs? I'd like to know what all the little bits are called.

Sunday, 27 July 2008

The Runwell: Day 3

Today's big task was the front wheel: getting the rims, spokes, and hub cleaned and inspected. Everything seems true and tight and sturdy, and it certainly looks better now than it did. I used a combination of light oil and steel wool, and Brasso polish. I also had a go at removing the pedals, but was only able to get one off.  The other is stuck fast and is going to need some serious help. The pedals weigh about half a pound each (a slight exaggeration, perhaps), which surprised me. I also got most of the paper or cardboard, or whatever was under the grips, off the handlebars, and realized that probably the worst rust on the bike was hiding under there. 

Once I get a rust treatment on, they should look better, and hopefully there's not too much damage. I guess I'd rather have it there than anywhere else, though. Work is probably going to slow down a bit, as I have more pressing obligations to attend to, but I'll keep posting my progress here as I go.

Friday, 18 July 2008

How to Adjust a Sturmey-Archer Three-Speed Hub

Sometimes I actually post useful information.  Sometimes.

So, I've kept kind of quiet about it, but ever since I put my Columbia Sports III back together last, uh, November, I've been having trouble getting the hub adjustment right.  This is mostly the result of the fact that I experience problems while on a ride, stop to quickly make some stop-gap adjustments, then realizing later that it's still messed up, and just keep repeating the process.  Finally, I got fed up with it, and decided to devote some time to getting everything adjusted exactly right.

As usual, Sheldon Brown has the definitive guidance on the subject, but I wanted to make things a bit more explicit and illustrated for you fellow first-timers.  So, here we go:

Correct hub adjustment is extremely important.  First, it allows you to take full advantage of all three of your gears.  Second, it prevents "freewheeling," which isn't nearly as much fun as it sounds.  Freewheeling on a 3-speed occurs when the internal gizmos in the hub align so that the pedals can spin forward without engaging the drive.  In other words, the pedals are turning, but you're not moving the bike forward anymore.  This can be extremely dangerous when you think you're solidly in a gear and pedaling along with resistance and suddenly your legs start spinning uncontrollably.  This throws your whole bike/body alignment out of whack and you are certain to at least wobble, and possibly lose total control.  Not good for riding in traffic or crossing an intersection, certainly.

Proper adjustment is actually pretty easy, provided you have an ample dose of patience.  There are basically only two parts to adjust: the indicator spindle, and the cable tensioner.  The indicator spindle is the little rod and chain that emerges from the right side of the three-speed hub.  One end of the rod is threaded with tiny threads, and this end screws into the hub itself (see photo).  This is where you make your first adjustment. 

Disengage the shifter cable from the indicator spindle so that you can unscrew the indicator spindle and take it all the way out of the hub.  Check to make sure it's not bent or damaged.  If everything is okay, reinsert the indicator spindle and tighten with just your fingers until it stops, then back it off a half turn.  This is really important, because if you back it off too much, the indicator spindle doesn't fully engage with the gearing mechanism inside the hub.  This was my problem, and caused me no little amount of frustration before I realized it.  If the indicator spindle isn't seated properly in the hub, no amount of adjustment to the cable will help.

Now, reattach the cable to the indicator spindle.  Tighten the cable tensioner (the barrel on the end of your shifter cable) by screwing it on to the indictor spindle, and use the little locknut on the indicator spindle to hold the tensioner in place.  It should look something like this:  

Now comes the tricky part.  I'll let Sheldon Brown explain it, with particularly important passages highlighted:

For best results, adjust the cable by tension. When the trigger is in high gear position, the cable should be totally slack. Shift down to middle gear, while watching the indicator chain-it should clearly move as you make the shift. Then shift to low gear; again, you should see more chain coming out of the end of the axle. Sometimes the internal parts line up in such a way as to prevent downshifting. If you have trouble getting the hub to downshift, turn the pedals slightly forwards. Once you are sure you are in low gear, take hold of the indicator spindle chain and try to pull more of it out of the axle. If the adjustment is correct, you should be able to get just a tiny bit more movement from the chain. If it is completely taut, the cable is too tight. Make sure to tighten the knurled locknut on the indicator spindle so that the adjustment will stay as you have set it.

Double check the adjustment in all gears. In low gear, you should be able to see that the sprocket moves faster than the wheel, and the hub should not make a ticking sound while being pedaled forward. In middle gear, the sprocket should move at the same speed as the wheel, and you may hear a slow ticking as you pedal. In high gear, the wheel should turn faster than the sprocket. The same slow ticking may be audible in high gear.

If you hold the trigger halfway between middle and high gear, the hub should disengage so that you can spin the pedals forward without going anywhere. If it freewheels forward in high gear, the cable is to tight or has too much friction to release properly. If it freewheels forward in middle gear, the cable is too loose.

If you're anything like me, you will have to make many minute adjustments to the cable tension until you get it just right.  The key points again: 1) properly seat indicator spindle in hub; 2) freewheel in high gear means cable is too tight; 3) freewheel in middle gear or low gear means cable is too loose; 4) there should be no ticking sound when pedaled forward in low gear; 5) hub should freewheel between 2nd and 3rd gear.

If you would like to read Sheldon Brown's original article in its entirely, go here.  Sheldon also has lots of other great information about three speed (a.k.a. planetary, or epicyclic) gearing, including diagrams that show what's going on in there.

By the way, my experience related here is based on the Sturmey-Archer AW hub that is original to my Columbia, I have no experience with other S-A models or other hub-geared systems.

Thursday, 19 June 2008

Replacing the Peugeot's Rear Axle

A while back, I discovered that the rear axle on the Peugeot was bent. I ordered a new axle from Harris Cyclery, and have just now gotten everything put back together. It wasn't that hard, but life has a way of intruding on our best-laid plans. There aren't many pictures because I prefer not to leave greasy fingerprints all over the camera. Until I can hire a full-time camera operator, you'll just have to deal with it. Here's the rundown:

DISCLAIMER: I am
not a professional mechanic, and this post should be read only for entertainment purposes (if you find this kind of thing entertaining). If you want to do your own work on your bicycle, you should most definitely consult other sources, and if you are not comfortable performing your own work, consult a qualified professional mechanic.


Remove the rear wheel from the frame:
Without a bike stand, I just up-ended the bike and went to work. First, and most obviously, remove the quick-release skewer and make sure the little springs don't fly away. When removing the rear wheel, keep in mind that you'll have to handle the chain, as you will need to disengage it from the rear sprockets. It will be messy. I find it easiest to just remove the chain to begin with, using the chain-breaker tool, which isn't as destructive as it sounds. That way, I can give the chain a thorough cleaning, too. You don't have to do this every time you take off the rear wheel, and you probably shouldn't, but it's been a while since I did.

Once I removed the chain, the derailer "relaxed," since it's spring-loaded, and came to rest on the gear cluster. To keep the derailer out of the way, you can take a piece of wire coat hanger and rig a simple device to hold the derailer arm away from the rear sprockets. Hook one end around the derailer arm, and the other end to the frame. Wrap the wire in tape to prevent scratching the frame. With the derailer out of the way, just lift out the wheel.

Remove the old axle: For the mechanically disinclined (like me), this can be intimidating. There seem to be a lot of little parts in there, but don't sweat it too much, it's not really that bad. You should have a locknut and a bearing cone on each side of the hub (if you don't, you shouldn't be riding the bike). The bearing cone keeps the bearings contained within the hub and allows the hub to turn on the axle; the locknut keeps the bearing cone in place.

You can remove the locknut with a regular wrench, although if it's been on there a long time, you might want to put a drop or two of oil on it to make it easier to turn. There is a special wrench that makes it easy to remove and re-install the bearing cone (called a cone wrench), but I've never used one. Most sites and mechanics recommend you get one, and they're fairly cheap, so I have no excuse. Since the bearing cone shouldn't be screwed down too tight (to allow the bearings to turn freely), you can probably wiggle it loose with your fingers and a small wrench.

With the bearing cone off, the bearings will be exposed, and if they aren't contained within a ring, they will be loose within the bearing cup (the picture at left shows the bearing cup after the bearings were removed). Be very careful that you don't accidentally dump the bearings out, because if they're old and the grease is dry, they'll just fall right out, and you really don't want to lose your bearings (ba-dum-bum). On the Peugeot, each side of the hub has nine bearings (I don't know if it's different with other bikes). Once you've removed the locknut and bearing cone on one side (the side without the freewheel), you can slide the axle out of the hub. I was sitting, holding the wheel horizontally across my knees to do this, and fortunately caught the down-side bearings in my hand as I slid the axle out of the hub. The photo at left shows the hub with axle and bearings removed.

You will now be holding the old axle in one hand and the wheel in the other. Put the wheel aside for a minute. The old axle will still have the bearing cone and locknut on one side, and to get these off, you may have to grip the old axle with a pair of pliers or a vice in order to get enough leverage to turn the nut and cone off. If your axle is still good and you want to keep it, you should grip it at the center and cover whatever gripping tool you use with tape or cloth to prevent it from damaging the threads of the axle. With the final hardware removed from the old axle, set it aside or put it in the odd bits section of your toolbox.

Clean and re-grease the bearings:
These literally keep your wheel turning, so if the bearings are dried up or mucky, you should clean them, as well as the bearing cup and the cone. I use Pedro's BioClean, which works quite well. Once everything is sparkly-clean, get your tube of grease and squeeze a healthy quantity around the inside of the bearing cup and spread it around with your little finger. Place each bearing back in the cup (the grease will hold them in there, but be careful handling the little buggers with greasy fingers), and when they're all in, cover them all with another dose of grease and pack in down a bit with the tip of your finger. Don't worry about putting too much in there, everything should have a nice thick coat. Do the same with the other side. You can put a piece of tape over the side you've already done just to make sure the bearings don't fall out when you turn the wheel over.

Install the new axle: I basically just did everything in reverse, threaded the bearing cone and locknut on one side of the axle, slid the axle through the hub, and threaded the cone and nut on to the other side, making adjustments to each side until the axle was centered in the hub. Again, don't over-tighten the bearing cone, the bearings need to roll within the cup. Since the freewheel is on one side of the hub, while the other is bare, you'll have to guess a little to make sure the axle is properly centered, and to do this, set the wheel back in the frame dropouts. The axle should protrude just a couple of millimeters from the frame on each side and the wheel should be centered in the frame. The new axle is a bit longer than the old one, so I added a couple of spacer washers between the bearing cone and the locknut on each side so that the quick-release could be tightened enough to firmly hold the wheel in the frame.

So, that's what I did and it seems to work just fine. For reference, the replacement axle was ordered from Harris Cyclery and has the following specs: Diameter: 10 mm; Thread: 1 mm; Length: 137 mm; Spacing: 126 mm.

Wednesday, 21 May 2008

Bent Axle

Well, there's yer problem.... So, I mentioned that my ride down to National City a couple of weeks ago brought to light some problems with the Peugeot that I hadn't noticed on shorter rides. Among these, the tendency of the back wheel to migrate ever-so-slightly to one side, and also for the wheel to get a little wobbly at the axle. You wouldn't think it would take a rocket scientist to figure out that the axle was bent, but it wasn't until I took the rear hub partially apart that I discovered the culprit (above). I've ordered a new axle from Harris Cyclery, which I hope will be the right size for the hub and dropouts, and the right threading for the hardware, which doesn't come with. When I get the axle, if it's what I need, I post the specs. Oh, and for anyone taking apart a hub, front or back, be aware that some hub bearings are loose (not held within a ring) and that little bearings can suddenly fall out and run all over the place if you're not ready for them. Not that that happened to me, mind you.

Ping Blog

Step 1
Blog URL:


Blog Title (optional):


Blog RSS Feed (optional):


I agree with terms of service.

Step 2
Copy the following code and put it on your blog/site to help our blog ping tool track your submission (Need help?):
;

 
Design by Free WordPress Themes | Bloggerized by Lasantha - Premium Blogger Themes | Best Buy Coupons